
Adding a bedroom to your basement will run you between $15,000 and $75,000, but the project only works if your ceiling clears seven feet and you cut a code-compliant egress window through the foundation wall. That window alone, a 5.7-square-foot opening with a ladder-equipped well, eats $2,500 to $5,000 of your budget before you frame a single wall.
Can You Add a Bedroom to Your Basement?

Yes, you can add a bedroom to your basement, but the room has to earn its status legally. A basement bedroom is not a bedroom under most building codes unless it meets specific safety standards, and those rules are strict for good reason.
The ceiling must clear 7 feet, and you will need an egress window large enough for an adult to climb through in an emergency. Proper insulation, ventilation, and heating are also required, along with smoke and carbon monoxide detectors. The stairs up must meet code too. Closets are usually optional, though local rules on radon, electrical outlets, and other details vary, so check with your building department before you cut a single board.
Budget anywhere from $15,000 to $75,000 for a full finish, or closer to $3,000 if your basement is already finished and you are only adding the bedroom elements. Most projects run 4 to 8 weeks once permits are in hand, though approvals can stretch that timeline.
Adding a basement bedroom should fetch a 70% return on investment, but a rentable space provides a much higher potential for ROI.
— Angi
If you are building with rental income in mind, finishing the full basement and adding that bedroom pushes your long-term return above 100%. The rest of this article walks through what makes the space legal and actually livable, step by step, so your inspection passes the first time.
1. Get Permits and Set a Real Budget
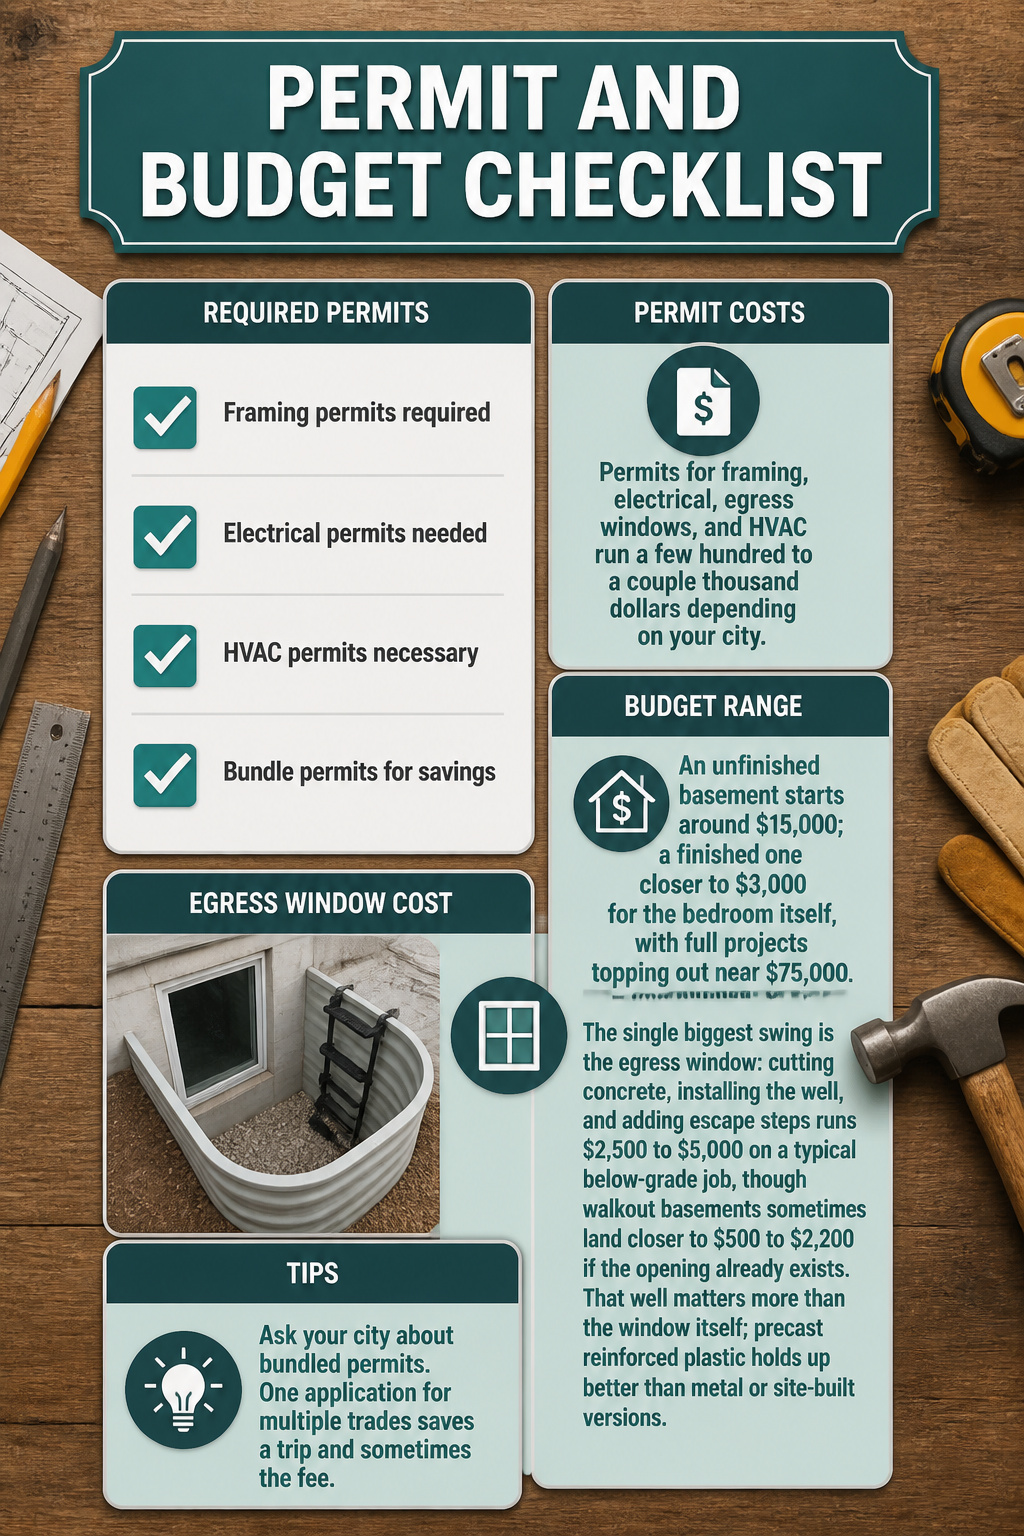
Permits for framing, electrical, egress windows, and HVAC run a few hundred to a couple thousand dollars depending on your city, and you need all four before you can legally call the room a bedroom. Most people guess low on both the permit total and the contingency fund, then stall mid-project when an inspector flags something they assumed would slide.
An unfinished basement starts around $15,000; a finished one closer to $3,000 for the bedroom itself, with full projects topping out near $75,000. The single biggest swing is the egress window: cutting concrete, installing the well, and adding escape steps runs $2,500 to $5,000 on a typical below-grade job, though walkout basements sometimes land closer to $500 to $2,200 if the opening already exists. That well matters more than the window itself; precast reinforced plastic holds up better than metal or site-built versions.
Ask your city about bundled permits. One application for multiple trades saves a trip and sometimes the fee.
2. Check Egress Requirements

Most DIY basement bedroom plans hit a wall the moment they reach the egress window. The code is unforgiving: the opening must be at least 5.7 square feet, with the bottom no higher than 44 inches from the floor. That 5.7 figure is what stops people, because a standard basement window is roughly half that size.
Cutting the concrete and dealing with grade level is the hard part. You are not just swapping glass; you are sawing through a foundation wall, digging a well, and often installing a ladder or steps for exit. Most homeowners hire this out, and the cost lands between $2,500 and $5,000 depending on how much earth you are moving and whether you need a precast well with built-in stairs.
This is non-negotiable for a legal bedroom. Without it, you have a den at best, and you will fail inspection. The window also needs to open without tools, no keys or latches to fumble in a panic.
3. Waterproof Before You Build

That faint, musty smell when you first open the basement door is water getting in somewhere. It might be seasonal, it might be a slow leak you have not found yet, but most basements have had at least one wet season, and yours will again.
Start by looking for dark streaks or chalky white residue on walls. That is mineral deposit left behind as water evaporates through the concrete. Check corners for rusty nails or damp wood; slow leaks hide where the wall meets the floor. Seal every wall and floor joint with a proper vapor barrier before you frame anything. Skip this, and you will be tearing out drywall later to deal with mold you cannot see from the outside.
A sump pump belongs in your plan if water pools during heavy rain. Even with good sealing, groundwater finds the lowest point. Run a dehumidifier afterward and keep humidity between 40 and 60 percent. That is an ongoing need, not a one-time fix. Vapor barriers and dehumidifiers work together; one without the other leaves you with damp air trapped behind walls, which is where the trouble starts.
4. Insulate for Warmth and Quiet

Basements lose heat to soil on all sides, not just through one exterior wall, so the insulation strategy needs to account for constant ground contact and the occasional moisture that seeps through concrete. The ceiling matters too. If your HVAC runs through the joist bays or someone sleeps on the floor above, soundproofing is not optional unless you enjoy waking to every footstep.
Three ways to handle it:
- Spray foam seals air gaps and resists moisture, but runs around $3,000 for professional installation in a typical basement bedroom.
- Mineral wool costs less and blocks sound better than the other two options; it also resists fire, which matters in a below-grade space with limited exits.
- Fiberglass batts work for tight budgets, though they absorb moisture, lose R-value when damp, and can support mold. Some contractors refuse them for basements entirely.
If you go with batts or mineral wool, pair them with resilient channels or acoustic panels on the ceiling. The extra step runs the install closer to that $3,000 ceiling, but it is the difference between a bedroom and a cave no one wants to sleep in.
5. Frame and Wire the Room

Pressure-treated lumber belongs anywhere it meets concrete, and nowhere else. The bottom plate of every wall needs it, or you are building rot into the frame. Keep that plate off the bare floor too; a sill gasket or a strip of closed-cell foam breaks the capillary path from slab to wood.
Run your own electrical, but run it to code. Bedrooms need dedicated circuits, not an extension of whatever powers the freezer or the workbench downstairs. Pre-wire for ceiling boxes, switches, and any data lines you want before the drywall crew arrives. Some jurisdictions now require hardwired, interconnected smoke detectors when you add a basement bedroom, and updating the whole house to match can run $1,500 to $5,000.
For climate, you face a real fork. Extending existing ductwork costs roughly $10 to $40 per linear foot, assuming your furnace can handle the extra load. If it cannot, or if the basement never balanced well with the floors above, a mini-split system heats and cools without choking the main unit.
6. Hang Drywall and Paint

Drywall in a basement is not the place to save twelve dollars a sheet. Use moisture-resistant board, the green or purple face you will see stacked near the standard stuff at any supplier. Standard paper-faced gypsum absorbs basement humidity, swells, and gives mold a foothold behind your trim. The sources that have seen this go wrong insist on it.
Paint color works harder down here than it does upstairs. Every basement borrows some light from small windows or the stairwell, and the paint you choose decides whether that light travels or dies. Go for colors with a higher light reflectance value: soft creams, warm grays, muted beige. Satin or eggshell finishes bounce what little light you have rather than swallowing it. Pure white reads sterile and flat in a basement, but the real mistake is the other direction. Dark paint in a space with no natural light does not read as cozy. It reads as a cave. The warmth you want comes from the undertone, not the depth of the color.
Cost for the drywall and paint phase runs around $2,000 to $5,000 depending on the room size and how exacting you are about the finish. Sloppy mudding shows through paint forever, so the labor you put in here is labor you see every morning.
7. Choose Basement-Smart Flooring
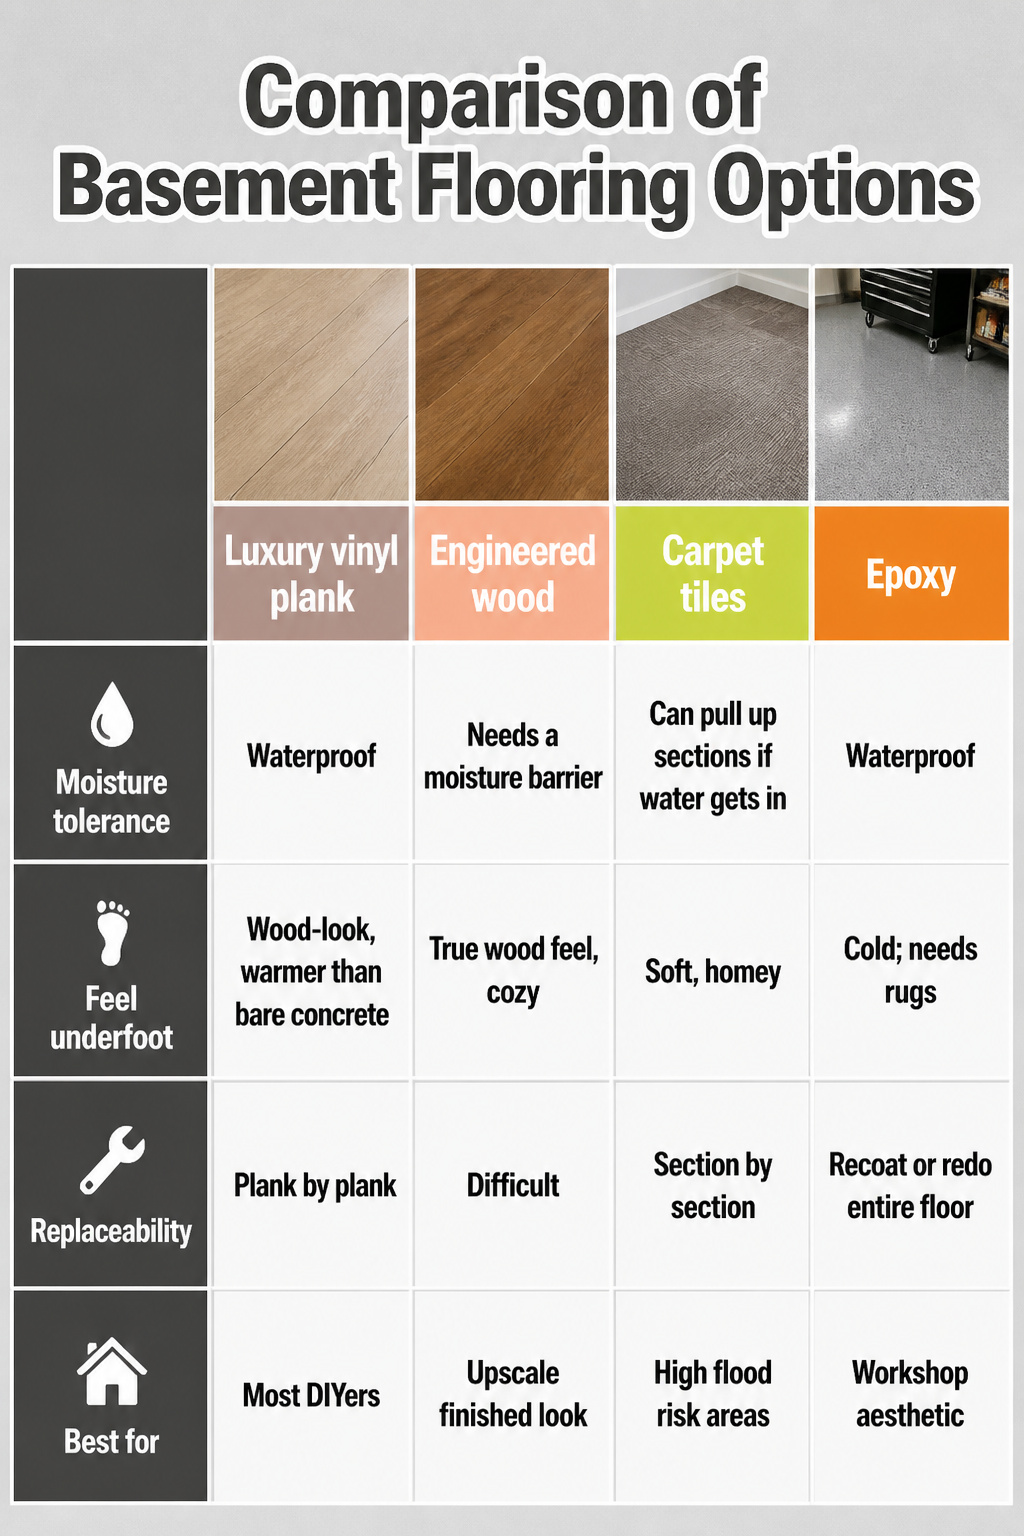
Basement flooring has to survive concrete that sweats in summer and shrinks in winter, so the usual upstairs favorites are not automatic winners here. You have four realistic paths for a bedroom, and one of them pulls ahead for most weekend budgets.
| Luxury vinyl plank | Engineered wood | Carpet tiles | Epoxy | |
|---|---|---|---|---|
| Moisture tolerance | Waterproof | Needs a moisture barrier | Can pull up sections if water gets in | Waterproof |
| Feel underfoot | Wood-look, warmer than bare concrete | True wood feel, cozy | Soft, homey | Cold; needs rugs |
| Replaceability | Plank by plank | Difficult | Section by section | Recoat or redo entire floor |
| Best for | Most DIYers | Upscale finished look | High flood risk areas | Workshop aesthetic |
Luxury vinyl plank wins for most basement bedrooms because it is waterproof, costs less than engineered wood, and goes down fast enough to finish in a weekend. Brands like Allure have track records in basements; the Honey Butter Oak color is one light-to-mid tone that reads as real wood without the risk.
Carpet tiles beat wall-to-wall carpet for one reason you will appreciate the first time a washing machine overflows upstairs: you lift out the wet tiles, dry the slab, and press new ones in. Wall-to-wall traps moisture against the pad and breeds mold you cannot see until you tear it out.
Engineered wood needs a vapor barrier or subfloor system underneath. Skip that step and you will be pulling up warped boards within a year or two. Epoxy is bulletproof but cold enough that you will want area rugs anyway, which pushes the total cost close to nicer options.
8. Layer the Lighting
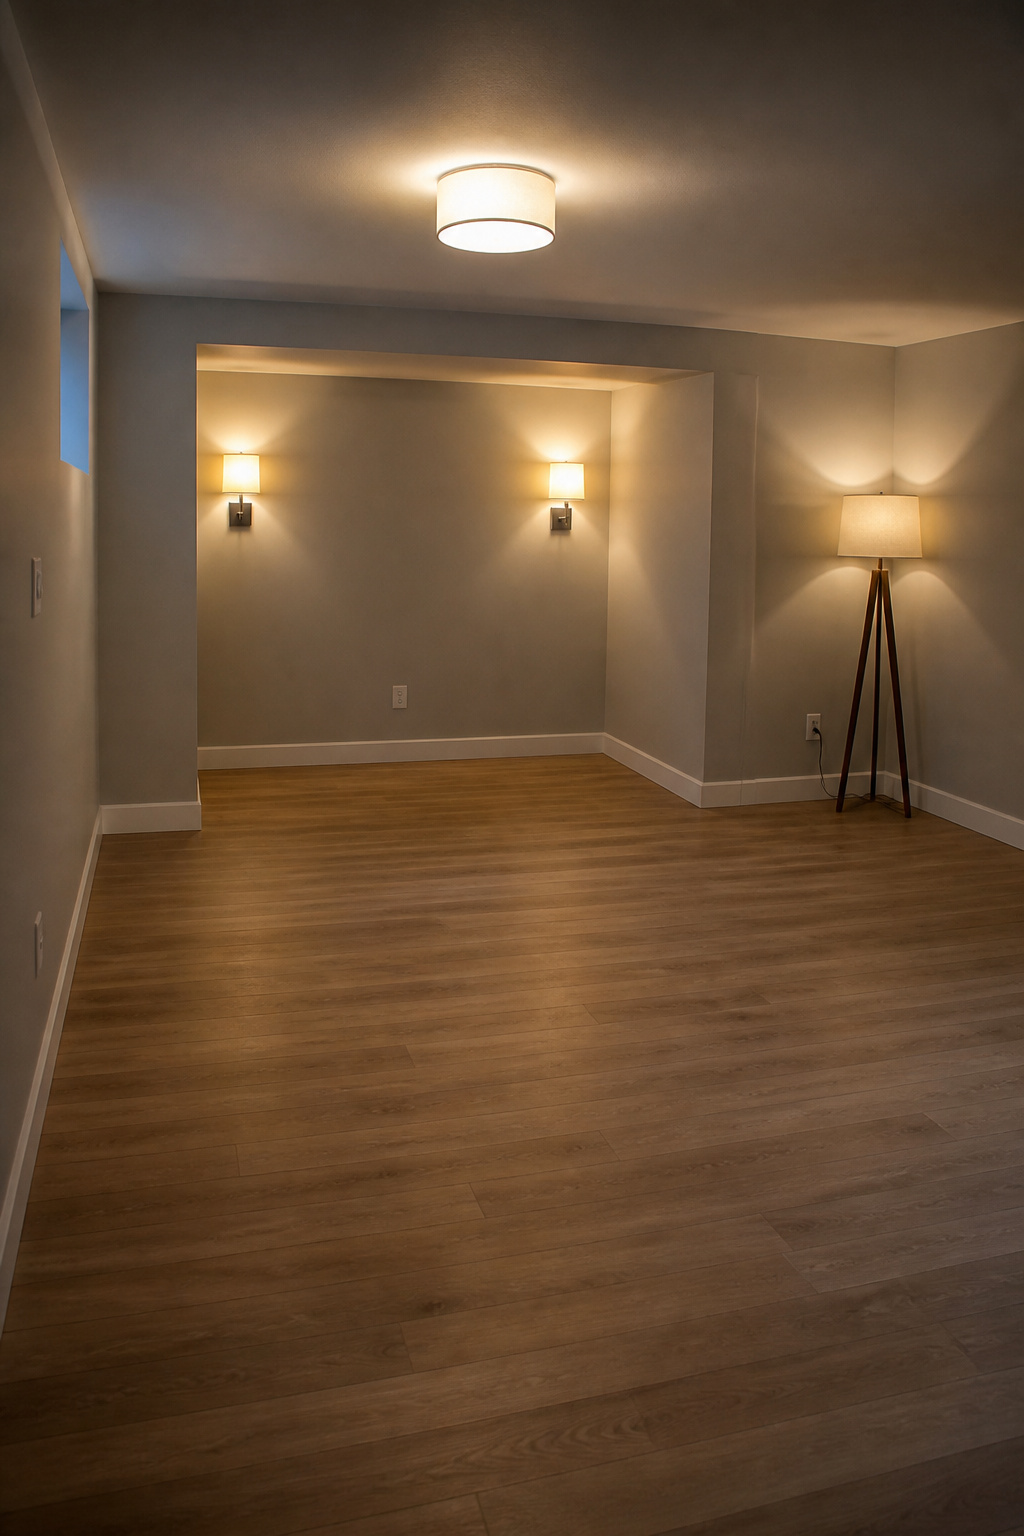
Basements need more light sources than above-ground rooms because natural light is limited or absent. One lonely bulb in the middle of the ceiling is how basements stay basements. Layer your lighting in three levels to make the space feel like a real bedroom.
Start with overhead fixtures for general brightness. Add task lighting where you will read or dress. Then bring in ambient sources such as wall sconces and floor lamps to soften the edges and add depth. A sconce beside the bed saves nightstand space, and a floor lamp in a corner fills the gap where ceiling light falls flat.
Put everything on dimmers. Bright for cleaning days, soft for winding down. The cost of a full layered plan runs $800 to $5,000 depending on the fixtures you choose. Wall sconces and floor lamps are the tools that let you adjust the mood with a switch, because the right lighting makes a basement feel alive rather than buried.
9. Furnish for Real Life

The biggest mistake you can make when you add a bedroom to basement space is treating it like a storage annex that happens to have a bed. Most basement bedrooms run smaller than upstairs rooms, so scale matters more than style. A queen bed with a storage headboard beats a king that leaves you six inches to walk around. Multi-functional pieces save the room: a storage ottoman at the foot of the bed, a Murphy bed that folds into built-in shelves, a mirror placed to bounce what light you have.
Warmth is what separates a basement bedroom from a basement. Layer a large area rug over hard flooring, sheepskin if you can find it cheap, or a vintage rug with some wear already in it. Soft throws and textured bedding do more than wood tones ever will, though warm flooring, heated tile, or carpet underfoot helps if you are still choosing materials. The point is to build in comfort deliberately, because the concrete and joists above will not do it for you.
10. Pass Final Inspection

The inspector will walk the room with a checklist, and this is where shortcuts you took in framing or wiring show up as red tags. Egress must open freely without tools, no sticking, no blocked ladder in the window well. Test every smoke and carbon monoxide detector yourself before the visit; many jurisdictions now require them hardwired and interconnected across the whole house, which can run $1,500 to $5,000 depending on square footage. Run the HVAC for an hour and check that vents deliver, especially if you added ductwork.
Electrical gets its own look: outlets, AFCI breakers, light switches. If you buried a junction box behind drywall, the inspector will find it.
Some areas require radon testing after construction finishes, since disturbing concrete and soil can shift levels even with mitigation in place. In rural spots on private septic, verify capacity with town records before you pull the permit. A failed system gives you roughly two years to replace it, and that job lands between $35,000 and $45,000. Better to know now than to find out when the health department gets involved.
What the Project Costs and Returns

Most basement bedroom projects land between $15,000 and $75,000, with the wide spread coming down to how finished the space already is and whether you are doing the work yourself or hiring it out. The single item that can surprise you is the egress window, which runs $2,500 to $5,000 by itself but is non-negotiable if you want a legal bedroom. After that, framing and drywall, electrical rough-in, flooring, and either extending your HVAC or adding a mini-split will chew through the rest of your budget in roughly that order.
Return on investment sits around 50% to 70% of what you spend, though that figure shifts significantly by market. A basement bedroom is worth about half what the same room above grade would be, which is precisely why the project still makes sense compared to a ground-level addition costing far more per square foot. You recover less proportionally, but you are also out of pocket less to begin with.
DIY or Hire It Out

Most people who add a bedroom to their basement split the work at egress windows and electrical. Both need to pass inspection, and most jurisdictions require licensed contractors for electrical and HVAC work anyway. The egress window alone runs $2,500–$5,000 and involves cutting concrete, installing a window well with steps, and grading for drainage. That is not a Saturday project.
Painting and flooring sit firmly in DIY territory. Luxury vinyl plank goes down in a weekend, and you will save thousands doing your own finish work.
The real stretch is the timeline. A DIY-leaning conversion runs 4–8 weeks on paper, but that assumes steady progress. In practice, your weekend timeline stretches to months once you hit inspection cycles. You frame, you wait for the inspector. You rough in electrical, you wait again. Each pass adds a week or two, and that is where hiring out pays for itself. A pro crew has the inspector on speed dial and knows which bundled permits shave time off the queue.
Budget reflects the split. DIY-leaning projects land around $8,000–$15,000. Go all-pro and you are looking at $15,000–$30,000. The gap is mostly labor on the technical trades, not the finishes.
Building Code Checklist

Before you frame a single wall, confirm your basement actually qualifies for a bedroom. The ceiling must clear seven feet over the finished floor, and that is non-negotiable. An egress window is required too: the opening needs at least 5.7 square feet, with the sill no more than 44 inches above the floor. It also has to open fast, no tools or keys, so a person can get out and a firefighter in full gear can get in. Hardwired smoke detection and proper ventilation complete the core list.
Local codes layer on top of these basics, and they vary enough that a phone call to your city building department is the only way to know for certain. Some jurisdictions add minimum square footage, typically 70 square feet. Others enforce radon mitigation or specific outlet spacing. If your home runs on a septic system, check capacity before you pull a permit; overloading it can trigger a failed inspection and a replacement running $35,000 to $45,000. Most basements will not face that issue, but the ones that do find out the hard way.
Common Mistakes That Cost Later

Most mistakes in a basement bedroom show up two years in, when the wall smells musty or the floor buckles. Here is what to watch for.
- Skipping moisture proofing. Mold and mildew spread fast in basements. Use rigid foam insulation instead of fiberglass batts, since foam will not absorb water or lose its R-value. Pair it with waterproof, mold-resistant wallboard rather than standard paper-faced drywall.
- Installing flooring directly on concrete. Always put down a vapor barrier or subfloor system first. Without it, engineered wood warps and carpet stays damp. Luxury vinyl plank handles moisture better but still benefits from that separation.
- Underestimating egress. A walkout basement window runs $500–$2,200 if it already meets code. Below-grade, cutting concrete and adding a window well with ladder climbs to $8,000–$14,000. That line item alone can double your budget.
- Forgetting ceiling height before framing. Once studs and drywall go up, the room shrinks by several inches. Measure the bare concrete and confirm the finished height still clears code, or you are tearing it all back out.
- Using untreated lumber on concrete. Pressure-treated wood belongs anywhere it touches the slab. Standard 2×4s against concrete will rot.
Frequently Asked Questions
What are the legal requirements for a basement bedroom?
A basement bedroom needs a ceiling at least 7 feet high, an egress window with at least 5.7 square feet of opening and a sill no more than 44 inches from the floor, proper ventilation, heating, and hardwired smoke and carbon monoxide detectors. The window must open without tools or keys so an adult can escape in an emergency. Local codes may add requirements like minimum square footage or radon mitigation, so check with your building department before starting.
How much does it cost to add a bedroom in the basement?
A full basement finish runs $15,000 to $75,000, while adding a bedroom to an already finished basement costs closer to $3,000. The biggest single expense is usually the egress window at $2,500 to $5,000. Framing, drywall, electrical, flooring, and HVAC extension or a mini-split system make up the rest.
Does adding a basement bedroom increase home value?
Yes, expect a return of 50% to 70% of project cost in added home value, though the figure shifts by market. A basement bedroom is worth about half what the same room above grade would be, but the lower upfront cost still makes the math work compared to a ground-level addition. If you finish the full basement and rent it out, long-term ROI can top 100%.
How long does it take to convert a basement into a bedroom?
Most projects take 4 to 8 weeks once permits are in hand, though permit approvals can stretch that timeline. Inspection cycles are where DIY timelines balloon; each pass adds a week or two. A pro crew with inspector relationships and bundled permits can shave time off the queue.
What flooring is best for a basement bedroom?
Luxury vinyl plank wins for most basement bedrooms because it is waterproof, costs less than engineered wood, and installs fast enough to finish in a weekend. Carpet tiles are the smart choice if flood risk is high, since you can lift out wet sections individually. Engineered wood needs a vapor barrier underneath or it warps within a year or two. Epoxy is durable but cold enough that you will want rugs anyway.