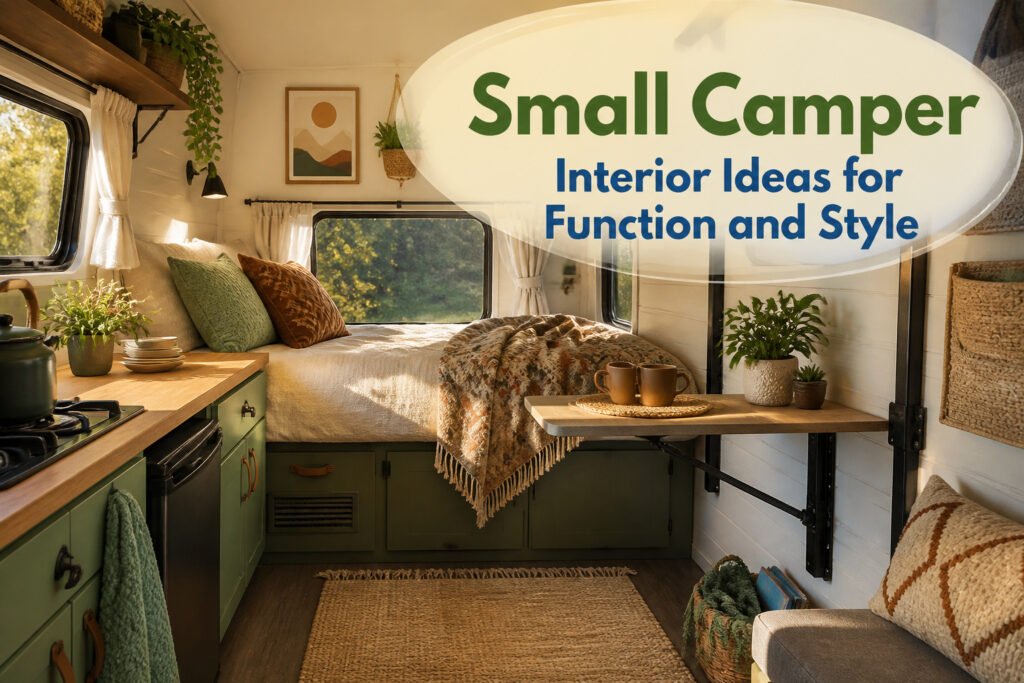
Small camper interiors in 2026 run from a sixty-dollar projector screen rig to a full four-figure gut job, and the single question that sorts them is whether you need the bed working Monday morning. Most weekend projects stall because the builder tore out the sleeping area first and the weather turned. The Lagun table system, a single post that swings flat against the wall, is the detail that shows up in nearly every finished build for a reason: it reclaims floor space without unbolting anything, and you can mock its arc with cardboard on a broom handle before you drill.
1. Multi-Functional Furniture
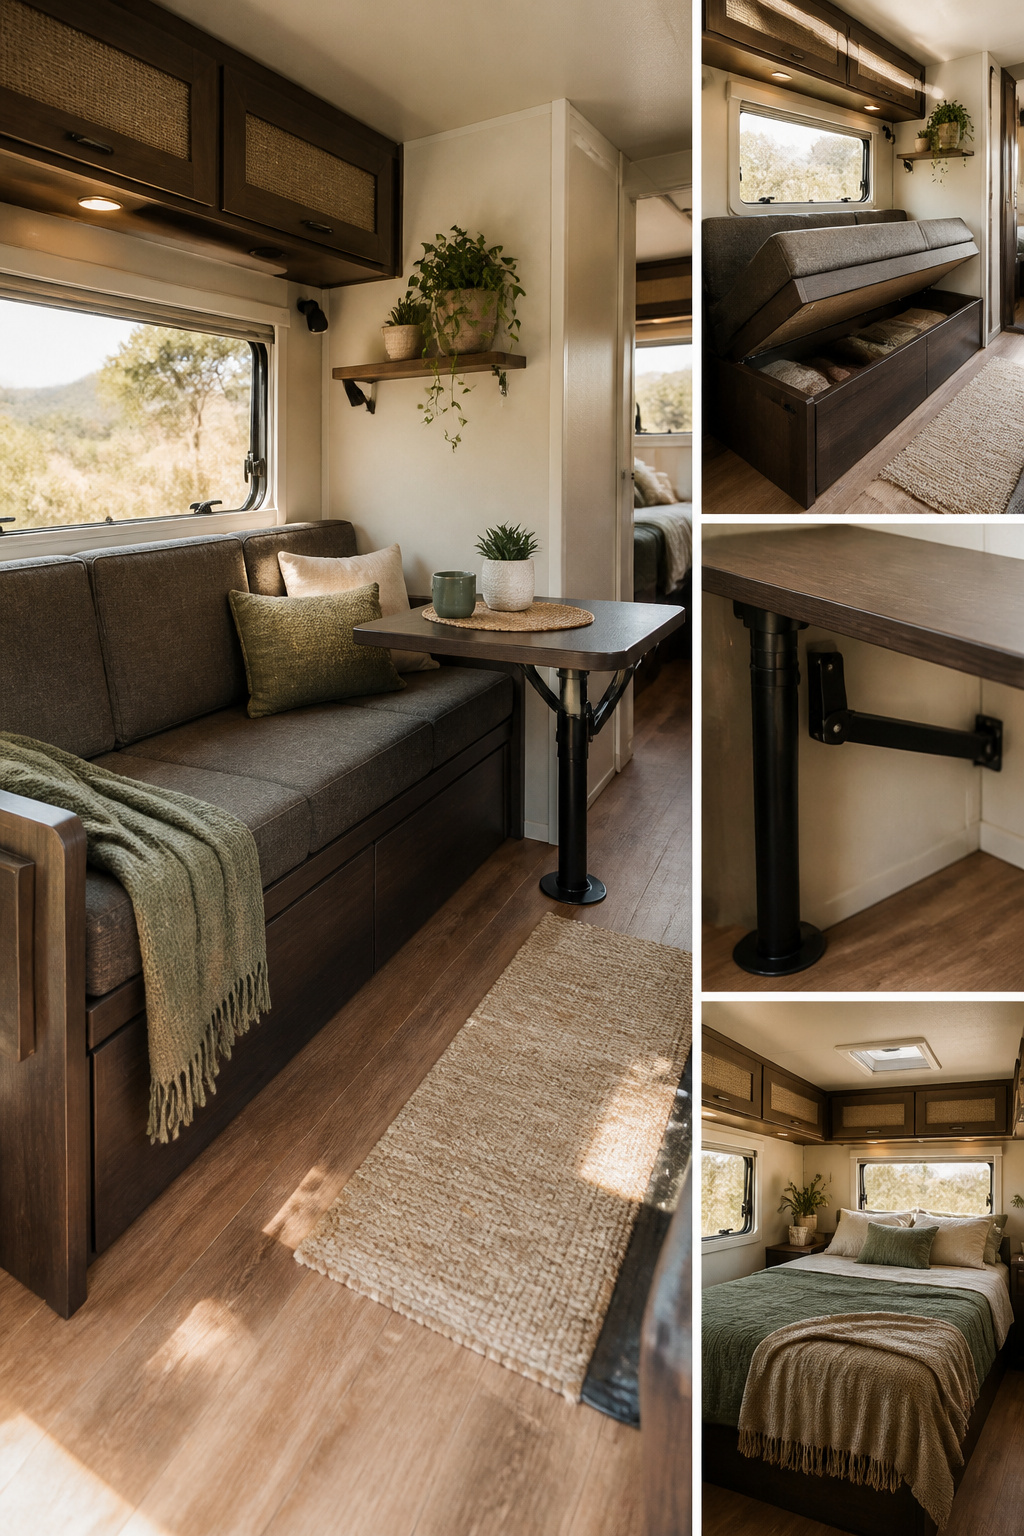
A sofa that becomes your bed at night is the first purchase that pays for its square footage twice. Look for one with storage underneath; the bench seat that lifts or drawers that pull out keeps bedding from eating your closet. The Lagun table system mounts to your wall or seat base on a single post and arm, then swivels to face the bench, the cab seats, or out of the way entirely. You eat breakfast over it, work a laptop on it, dry dishes beside the sink, then swing it flat against the wall and you have floor space again.
Fold-out tables that hinge from the wall or slide from under a counter work the same trick for less money, though you lose that pivot. What to watch when you buy: check the folded profile. A table that still juts six inches into the aisle is a shin-bruiser you will resent by day three. Test the latch, too. In a moving van, a table that droops or rattles is a table you stop using.
2. Smart Storage Solutions
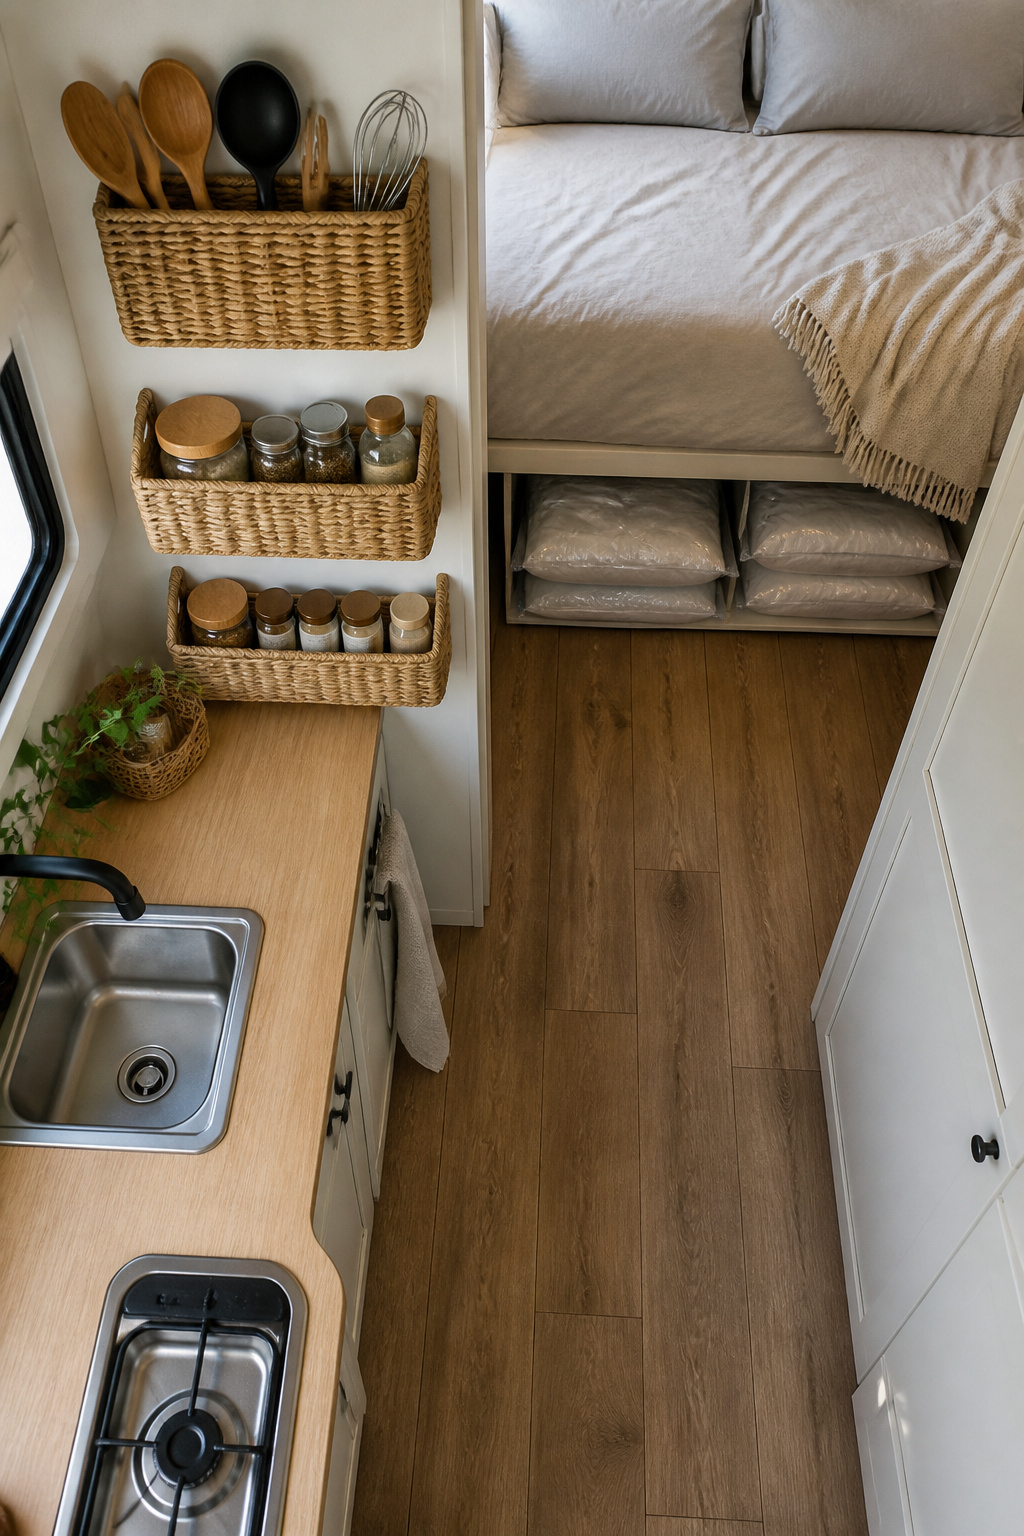
Vertical space is the first thing you ignore and the first thing you regret wasting. In a small camper, wall organizers give you storage without eating floor space, which matters when every square foot has to earn its keep. Mount a few near the door for shoes and outer layers, or line the galley wall with narrow racks for utensils and spices so the counter stays clear.
Under the bed is where bulk lives. Slide in plastic bins or rolling drawers for off-season clothes and spare blankets, but vacuum-sealed bags are the real move for fabrics; they shrink the pile down enough that you stop fighting the lid. If your bed lifts on hinges, you will actually use this space instead of abandoning it to what you can reach at the front edge.
Built-in cabinets keep the visual noise down. A camper that looks organized feels larger, so plan closed storage for the daily clutter you do not want to look at: charging cables, loose papers, the coffee supplies you grab half-awake. The family campers who pull this off best are the ones who decided where everything hides before they moved anything in.
3. Cozy Textiles and Soft Furnishings
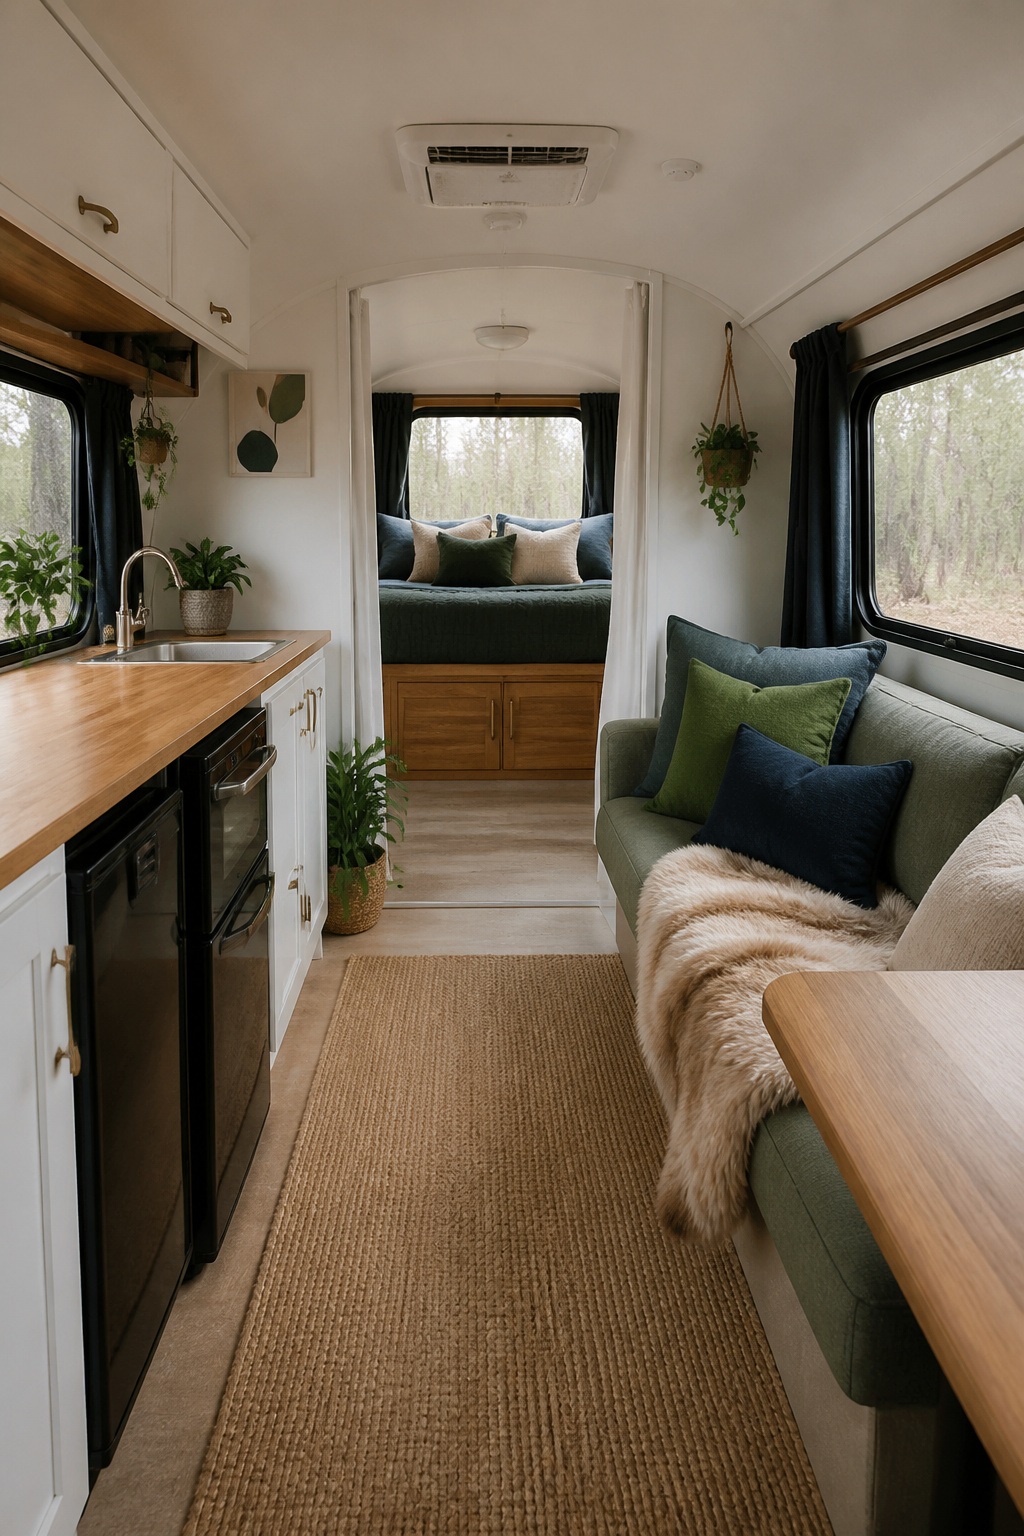
Cold mornings in a camper tend to hit the floor first. A low-pile rug you can shake out or hose down will take the edge off without trapping grit the way a shag would. Position it where you step out of bed, and you have an immediate warmth upgrade that costs less than a tank of gas.
For curtains, blackout fabric is the one detail that earns its space. It blocks morning light for better sleep and reflects daytime heat so your small space stays cooler. Semi-blackout works over the dinette if you want some natural light without full exposure; full blackout belongs where you actually sleep. Mount either on a slim tension rod or a low-profile rail that sits close to the wall, because every quarter inch of clearance matters when you are walking past.
Cushions and throw blankets should be machine-washable, full stop. Cotton, linen, or a short-nap faux fur layer easily and survive the road. Skip anything that demands dry cleaning or delicate cycles; you will not bother, and it will look tired within a season. Slipcovers over existing seating let you add color without committing to reupholstery, and they peel off for washing when the trip ends in mud or campfire smoke.
4. Creative Lighting Options
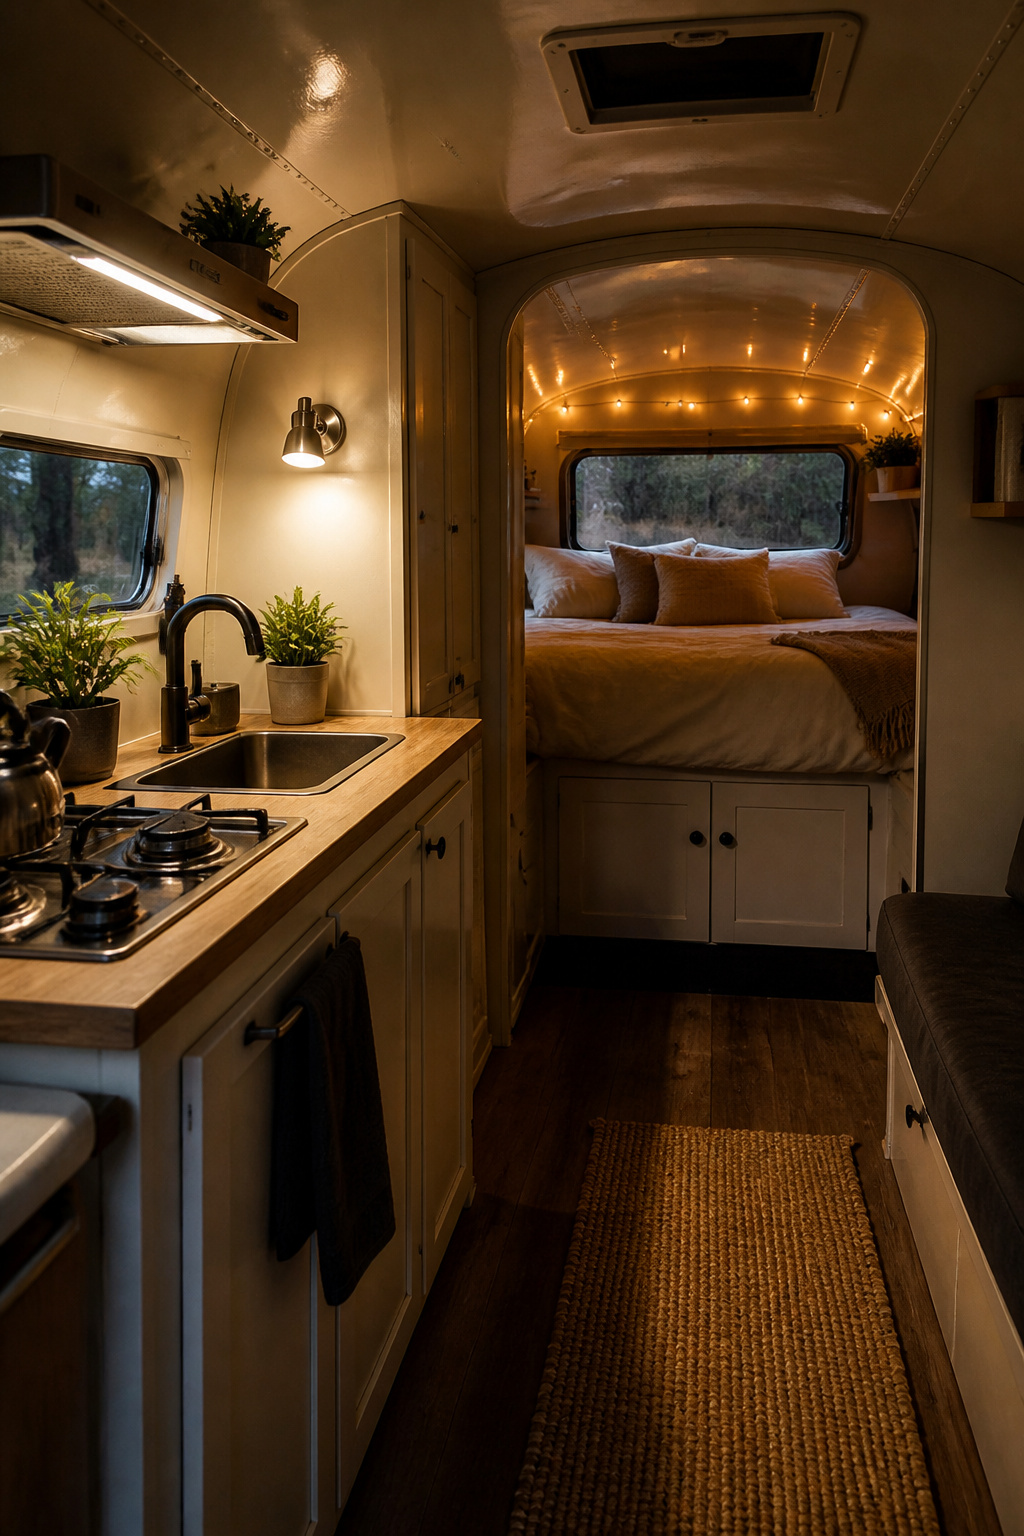
Layered lighting in a small camper works the same way it does in a studio apartment: you need light that does a job, and light that settles the space. Start with a bright, stationary source near the front for cooking and cleaning. A stick-on LED strip under the cabinet edge gives you task light exactly where the knife lands, and the strips draw so little power that running them for hours is not a concern on a modest battery bank.
For the back of the camper, string lights near the bed create a softer layer that makes the space feel larger than one harsh overhead ever could. Add a movable reading light, magnetic if your interior has exposed metal to grab onto, and you have three sources where one used to struggle alone. Dimming matters more in a camper than in a house, because 20 square feet at full brightness feels like an interrogation at 10 p.m. If your LEDs are not dimmable by default, look for strips with a small inline controller; the warm-down at evening is worth the few extra dollars.
Battery-powered puck lights fill the gaps where wiring feels impossible, and they stick on in seconds. For off-grid use, prioritize 12v systems or USB-powered options over anything that needs an inverter; every conversion wastes power you could spend on an extra hour of reading light. Warm color temperature is the right choice for a space you sleep in, though some strips now let you shift cooler when you need to focus on a repair or a map.
5. Color Schemes and Decor
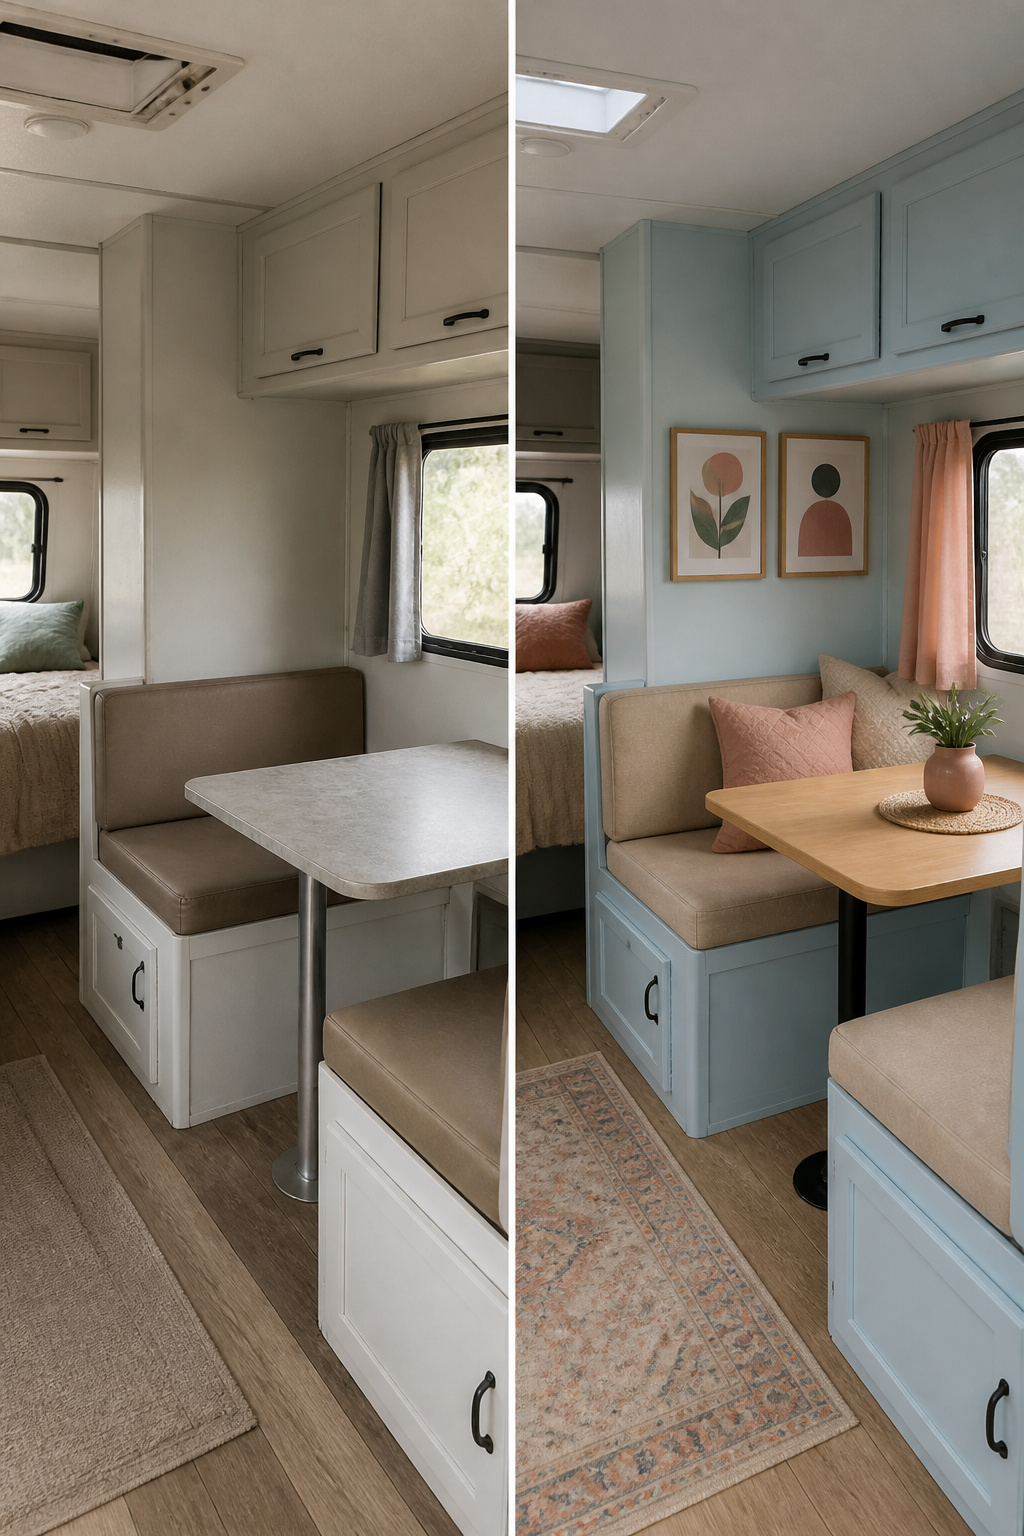
Light walls are the single easiest way to make a small camper feel larger than it is. White, soft gray, or pale blue bounce daylight around and keep the interior from closing in on you. For a more unified look, paint the trim and cabinets to match the walls; removing those visual edges stops the space from breaking into tiny, cluttered boxes.
Once the base is light, you can add personality without crowding things. Two or three main colors, total, is the limit. Use accent shades in small doses: a blush pillow, a warm beige curtain panel, a peel-and-stick floor in a tone that reads as quiet. A coordinated palette reads as intentional; a scattered one reads as small.
Artwork works if you keep it flat and off surfaces. Think Command-stripped prints above the dinette, not frames on the shelf. The rule is: if it sticks out past the wall, it competes with your elbow room.
6. Outdoor Living Enhancements
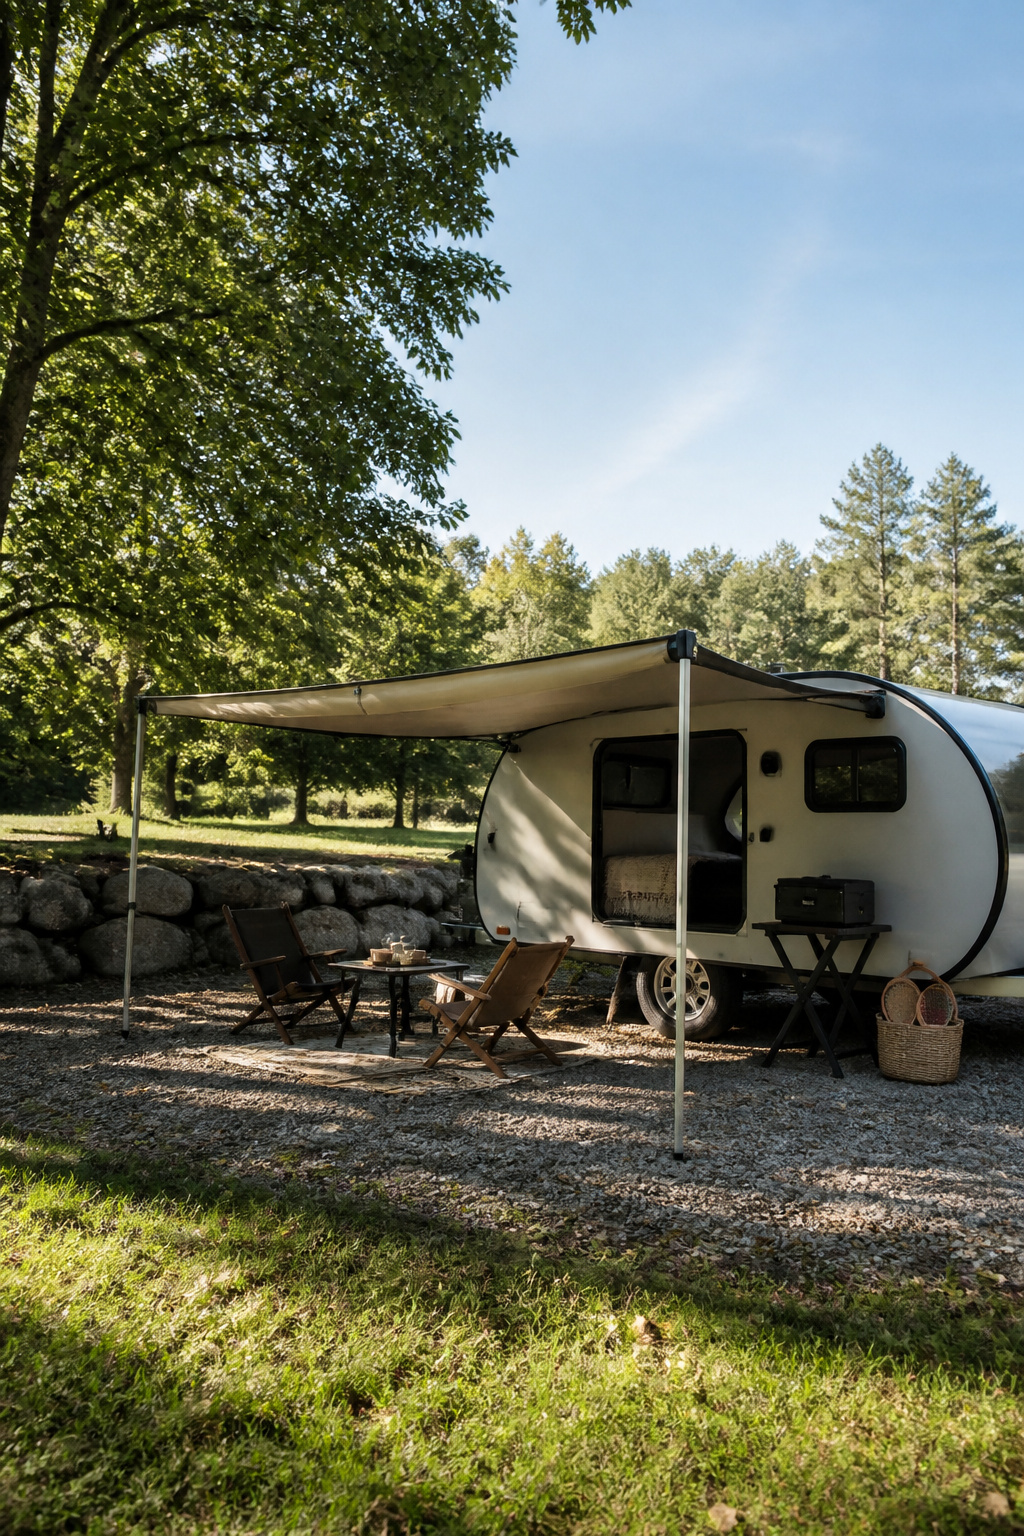
An awning changes how you use a small camper more than almost anything you bolt inside. Once it is out, you have a covered kitchen, a shaded living room, and a dry entry point, all without touching the interior square footage. In good weather, that effectively doubles your usable space.
You have two ways to go. A permanent retractable awning mounts to the roof rack or side rail and unfurls in about a minute. It stays with the van, so there is nothing to store inside, which matters when every cubic inch counts. The other route is a temporary shelter like the Moon Shade. It packs to the size of a camp chair, sets up with poles and guy lines, and stores in a closet or under a bench when you are driving. The tradeoff is setup time versus daily convenience.
For either one, the real gain is in how you arrange the ground beneath it. A compact folding table and two low chairs turn that strip of gravel or grass into a dining room. Add a small camp stove on a side table and you are cooking outside, keeping bacon grease and coffee spills out of the galley entirely. When rain hits, you are still dry. When sun hits, you are still shaded. The van stays cool because the heat load is outside, and you stay outside because you have a reason to be there.
The cost spread is wide enough that budget drives the choice more than features. A permanent awning runs a few hundred dollars installed; a temporary shelter like the Moon Shade comes in lower and moves with you if you swap rigs. Either way, the money goes toward square footage you do not have to build, insure, or tow.
7. Kitchen and Dining Area Optimization
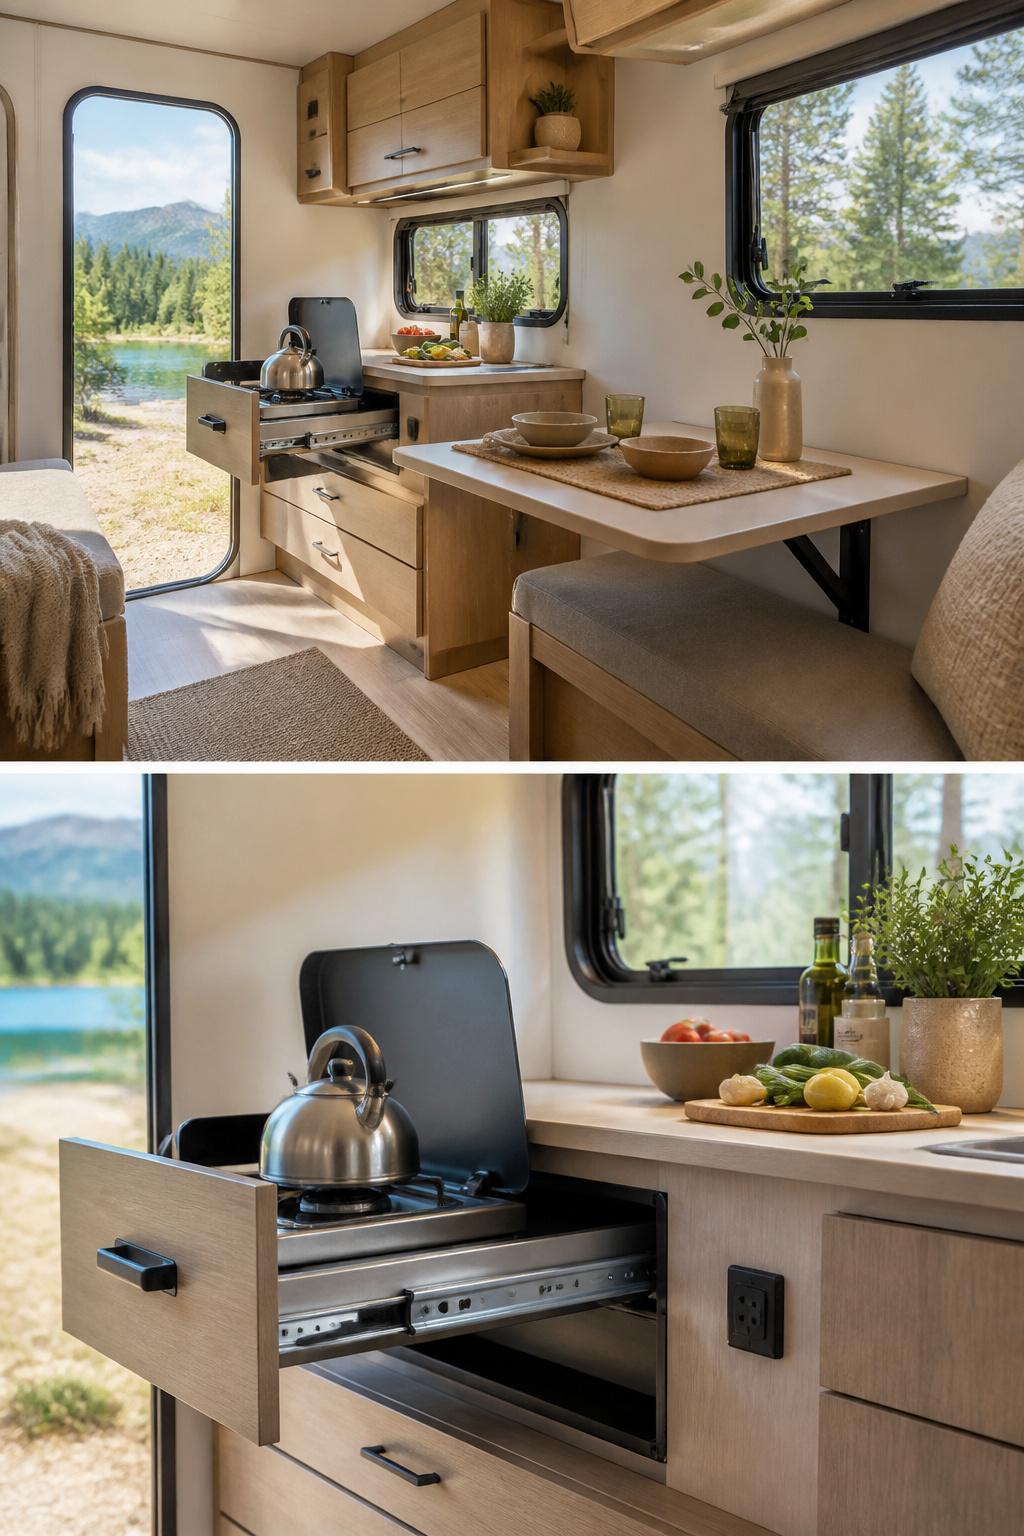
Pull-out kitchens sit on sliders tucked into the van body, which keeps cooking grease and food smells out of your living space entirely. That separation is the main reason builders in tight vans keep coming back to them, even though you can only use one when stopped and the setup-breakdown cycle stings on rainy nights.
A fold-out table mounted to the wall or slung under a counter earns its spot the same way: it is a desk for morning coffee, a dining surface for dinner, then gone. In a minimalist layout, that reclaimed floor space matters more than the table itself.
The real workflow question is sequence, not furniture. You need a landing zone for groceries before the fridge, counter space between sink and cooktop, and somewhere to plate without crossing the cook’s path. A pull-out kitchen solves this by putting the entire operation outside the van, but only if your camp setup allows it. The indoor fold-out table keeps you dry and cooking at 10 PM, though you will wipe grease off cabinets eventually.
For a sub-$1,000 weekend build, start with the fold-out table: it needs one sturdy hinge and a scrap of butcher block, not a full drawer slide and weatherproof housing. Add the pull-out kitchen only if you cook outside twice a week or more.
8. Bathroom Space-Saving Ideas
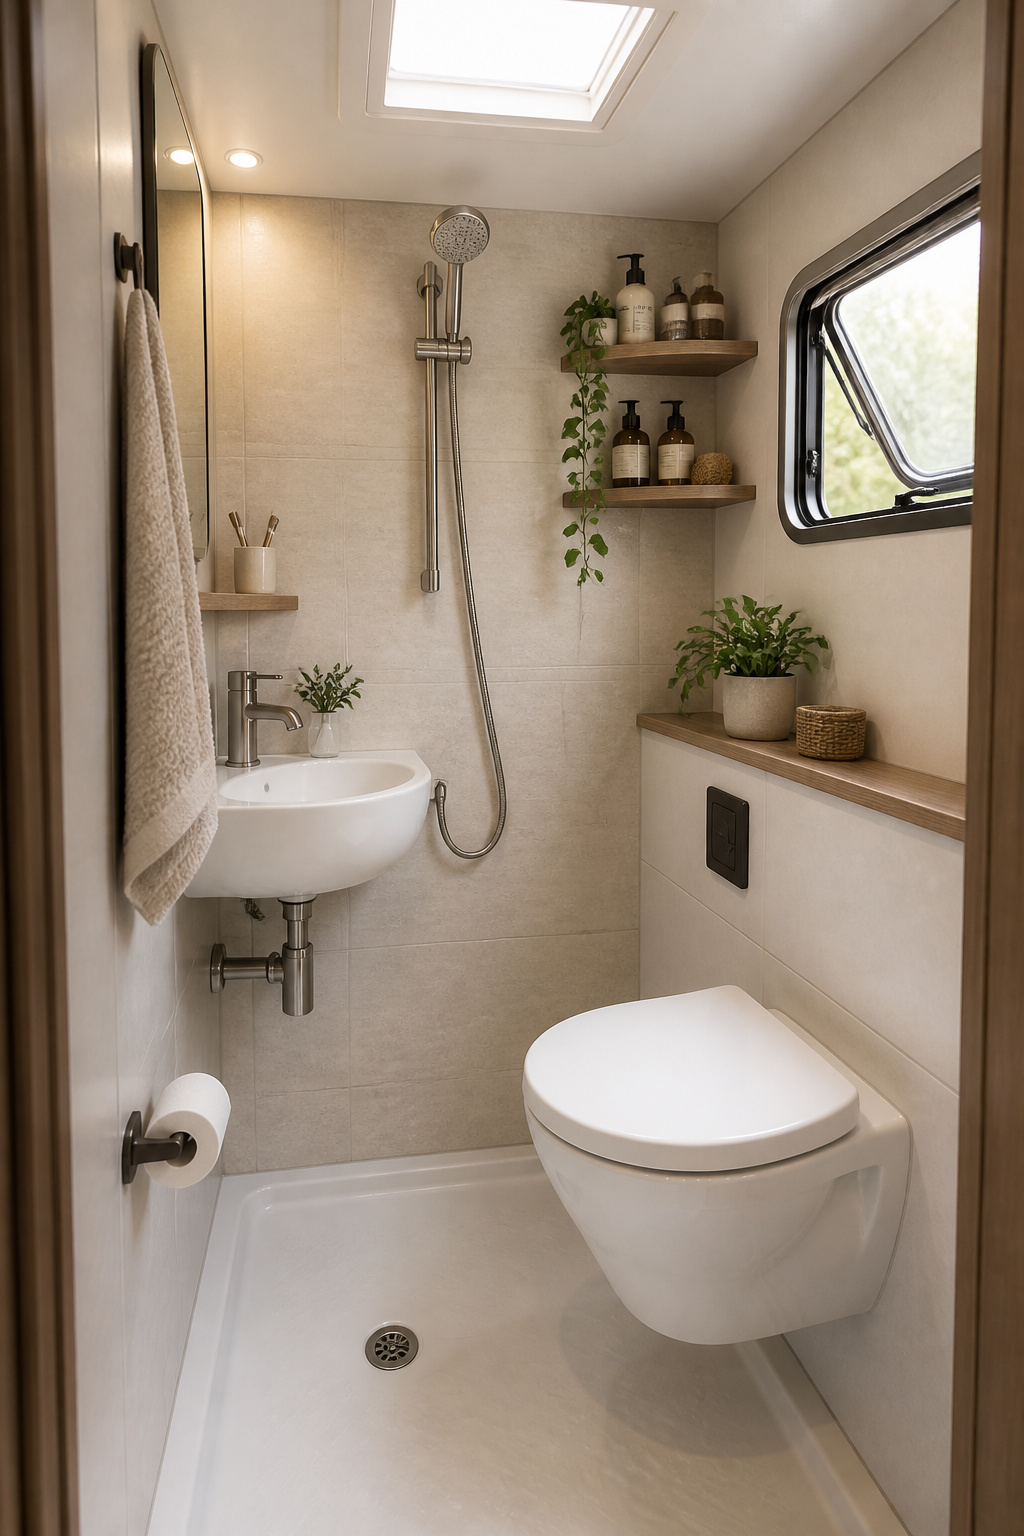
The bathroom in a small camper is usually the first place you lose patience, mostly because everything you need has to share about nine square feet with the thing you stand in to use it. A wet bath, where the shower and toilet occupy the same space with a shared drain, is the layout that makes this tolerable: you give up the dry-floor illusion and gain back roughly a third of the room for actual movement. Wall-mounted toilets free that same floor area the wet bath protects, and corner sinks reclaim the dead angle where a vanity would never fit anyway. Vertical storage above the water lines, not beside them, keeps your towels and kit off the one surface that is always wet. Purpose-built compact fixtures exist for this exact geometry; standard household sizes will cost you the inches that make the door close without a shuffle.
9. Bedroom Layout and Comfort
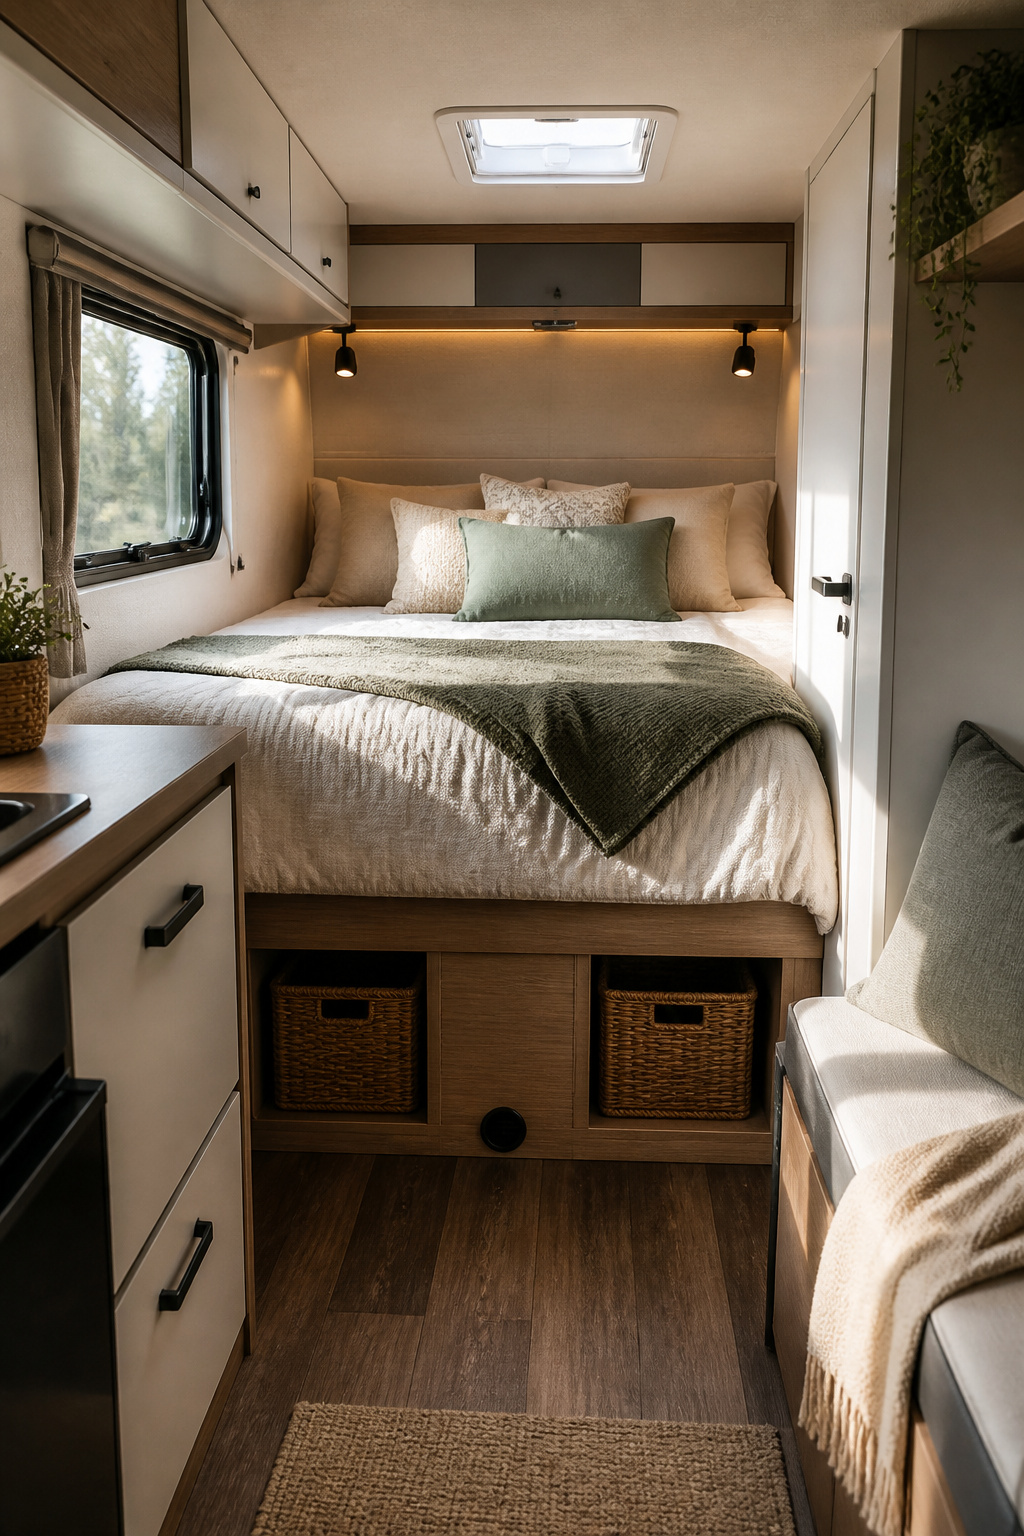
A memory foam topper is the cheapest sleep upgrade you will actually feel after one night. Most camper beds are not standard sizes, so measure yours before ordering, but toppers cut down to fit and they cost far less than replacing the whole mattress.
Where you put the bed controls how the rest of the day moves. A bed against the back doors frees aisle space but blocks gear stored behind it. A floating daybed with open space underneath, built from two seats and a removable center panel, lets you slide suitcases and bulky items straight out without converting anything. One couple who switched from a bench-to-bed setup said they spent less time on nightly assembly and more time actually using the van.
Think about temperature before you finish the layout. Small campers heat up fast in transit, enough to melt chocolate left out, so plan airflow across the sleeping area. If you run a thermostat linked to your phone, you can check the inside temperature from the trail and head back if it drops too low for pets left behind. For light, the same baskets that slide under the foot of the bed can hold phones, chargers, and a clip-on reading light, keeping the surface around you clear and the space darker when you want it dark.
Specific Products That Hold Up
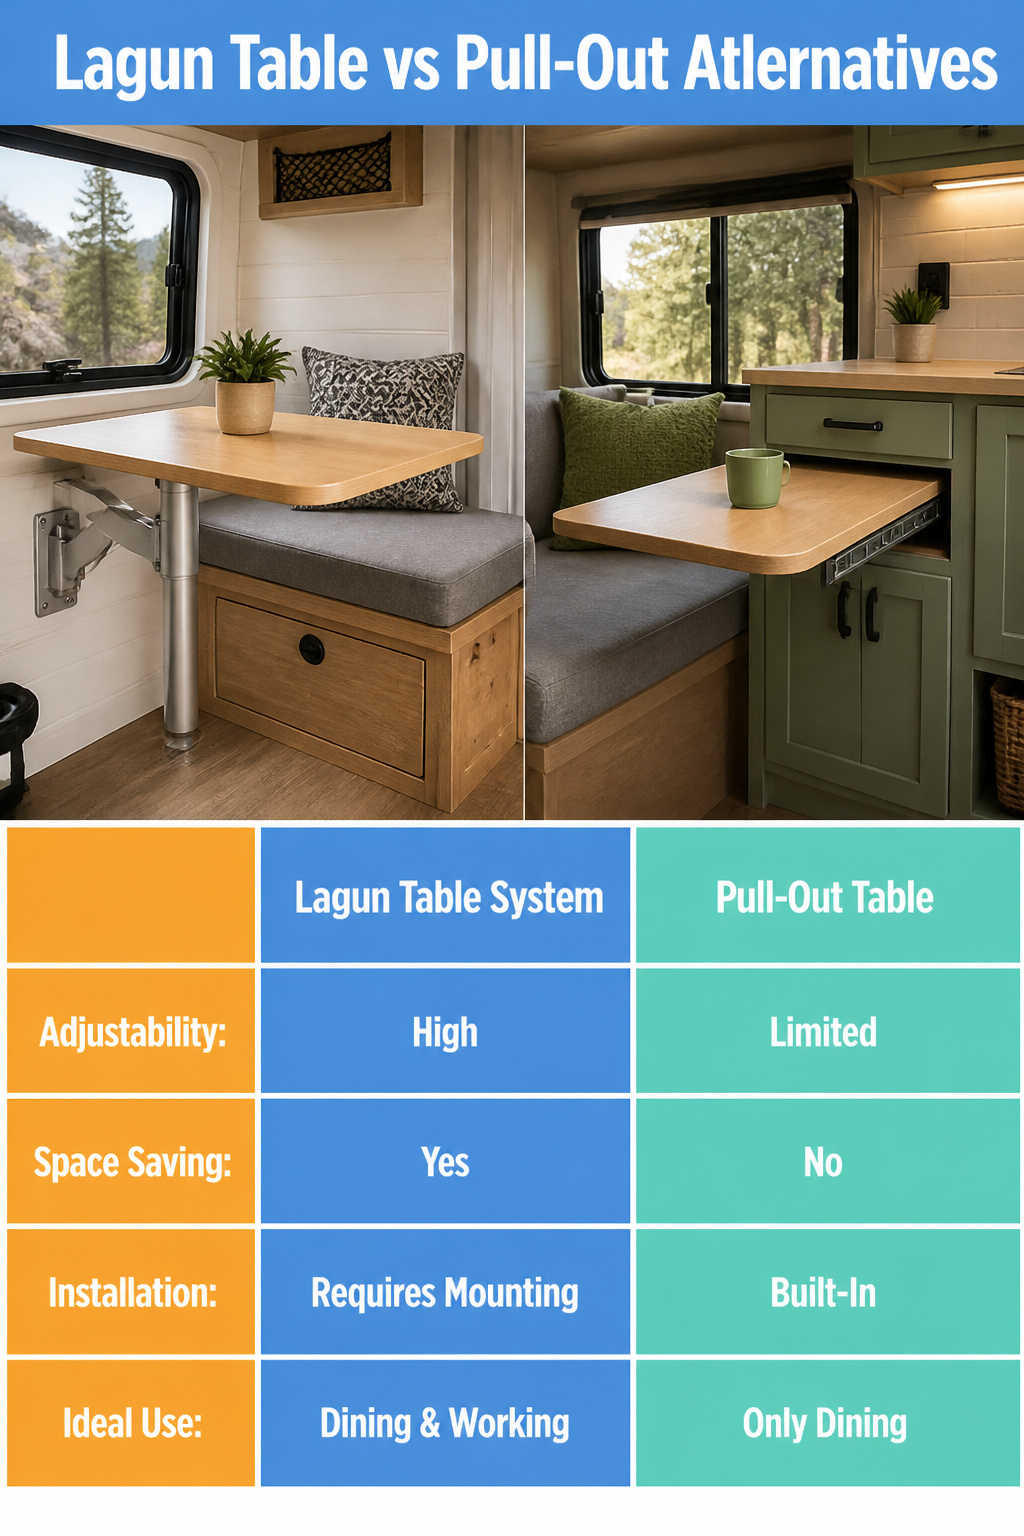
The Lagun table system comes up in almost every small camper build thread for a reason: a single metal leg lets you swing the table surface to any position, lock it for eating, pivot it away for sleeping, and reclaim floor space without unbolting anything. Alternatives exist, but nothing else matches the adjustability in the same footprint. Pull-out tables built into a cabinet work only where they were installed, and hanging tables, while cheap, tend to sway enough that a morning coffee becomes a spill risk.
What the enthusiastic posts rarely hand over are the measurements. A Lagun mount needs a vertical surface strong enough to take the bracket and enough clearance fore and aft for the arm to swing through its full arc. You will need to measure your wall stud spacing, the height of your seat base, and the distance you want the table edge to reach when extended. If you are between builds, mock the range of motion with a cardboard rectangle on a broom handle before you drill holes. Custom benches with storage underneath can solve the fit problem entirely, since they are built to your exact dimensions, but they cost the weekend plus materials and they do not move once installed.
Decor Themes That Work
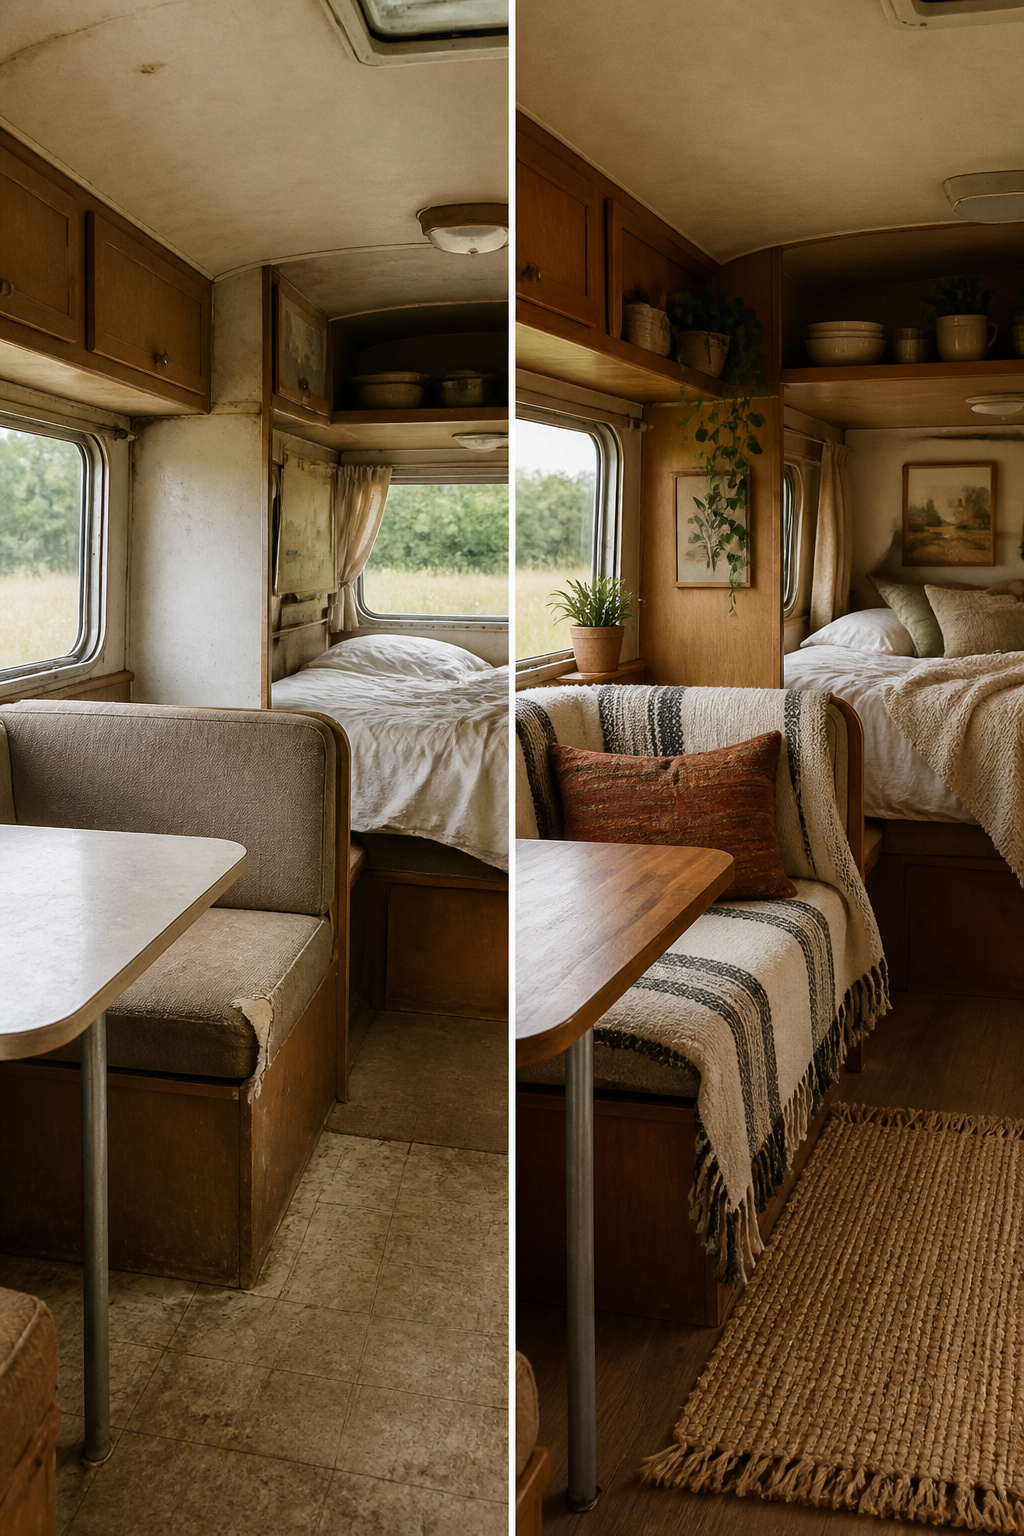
Bohemian and rustic themes get the most attention for small camper interiors, but the difference between a theme that lasts and one that falls apart is how you build it. Start with what you already own: thrifted enamelware, old maps, or a wool blanket that doesn’t hold dirt or smells. Layer those against newer pieces so the space feels collected, not staged.
Wool and natural materials hold up to road wear better than synthetics that trap odors. A linen quilt stays thin enough for a small sleeping area but still provides real warmth, and cotton sheets from a big-box store won’t ruin your budget if they need replacing after a season of heavy use.
The mistake is buying the whole look at once. Black walls paired with warm wood surfaces ground a tiny space visually, but that contrast shows every scuff. If you want dark paint, commit to touch-ups. For an easier life, keep the darker colors in textiles you can wash or swap, not on walls you have to repaint between trips. Removable art, peel-and-stick decals, or lightweight framed prints let you shift the mood without damage; a rotating gallery of your own photos costs almost nothing and travels with you.
Rustic themes built around wood tones and layered bedding age well because wear looks intentional. Bohemian styles with delicate lace or pressed flowers need more protection. If you camp with muddy boots or wet dogs, choose the theme that forgives dirt rather than the one that hides it beautifully for one weekend.
Tech Upgrades Worth the Power Draw
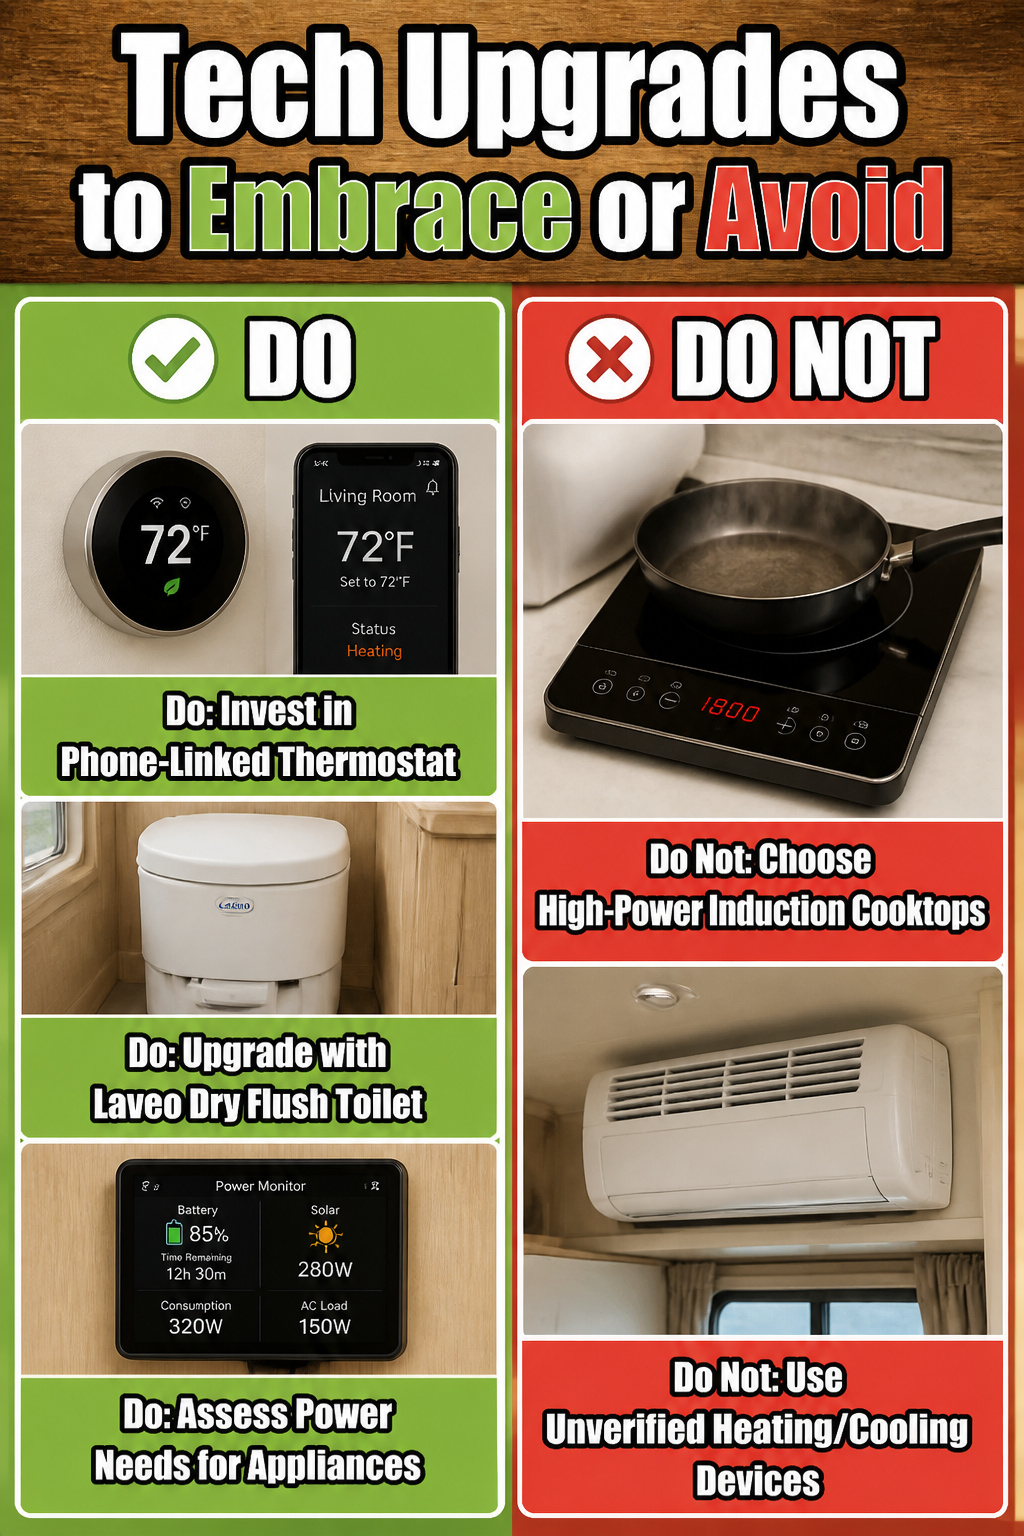
The gadgets that earn their place in a small camper are the ones that solve a problem you actually have, not the ones that look clever in a showroom. A thermostat and power monitor that links to your phone is worth the draw if you travel with pets or leave the camper for long hikes. You can check the inside temperature remotely and get an alert if it drops below your set point, which beats guessing whether the heater failed while you are miles up a trail.
Induction cooktops fall into a different category. The Empava 12-inch vertical two-burner runs fully electric, so you can cook without carrying propane. The downside is real: it pulls hard enough that you need to know exactly how much battery and solar you are working with. If you dry camp regularly, this is the appliance that forces you to upgrade the whole power system or skip it. The Laveo dry flush toilet runs on 12V DC and seals waste in cartridges of about fifteen uses, no water needed. That is a modest, predictable draw that fits most existing setups without a rethink.
What to skip if you are running on battery and solar alone: anything that heats or cools on demand without a clear wattage budget you have already tested. The phone-linked thermostat pays for itself in peace of mind. The induction cooktop only pays off if you have the panels and lithium to feed it.
What to Measure Before You Buy
Most small camper interior ideas you see online skip the measuring part entirely, which is why so many weekend projects end with a bench that blocks the door or a cabinet that crowds the aisle. Measure the space where your body actually moves, not just the floor plan.
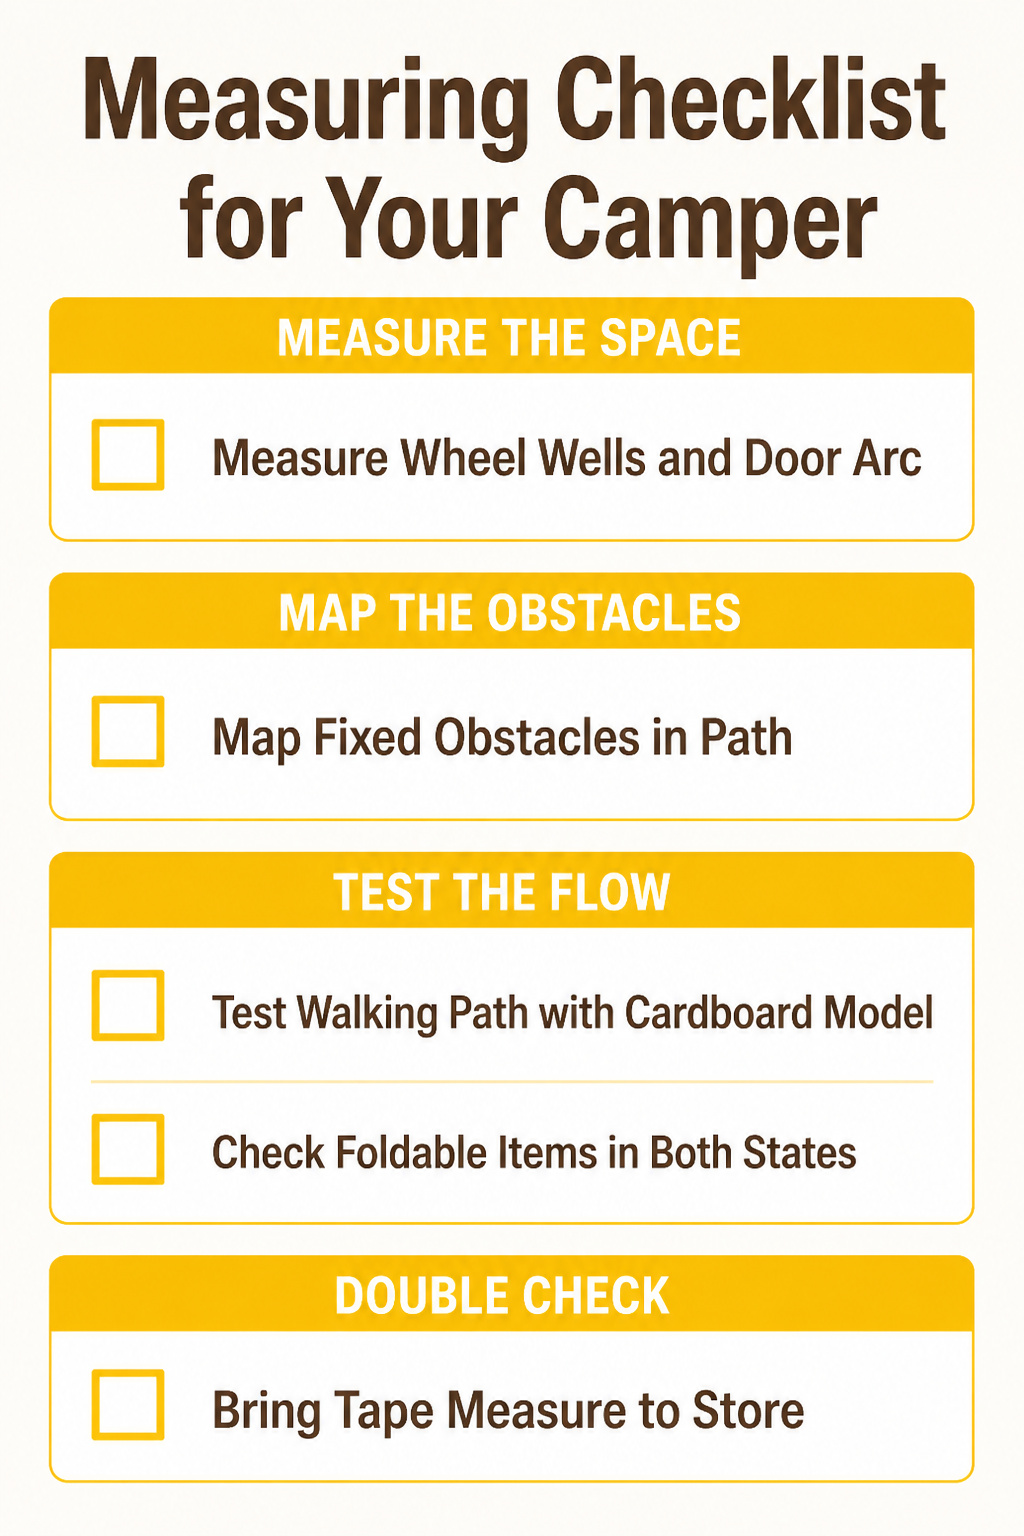
- Start with the wheel wells, door swing arcs, and any wall that curves. These kill more projects than square footage ever does. Record the height at three points: floor, mid-wall, and ceiling, because small campers taper in ways a single number hides.
- Map your fixed obstacles before you think about furniture. The water heater cabinet, wheel well, and fuse box do not move, so build around them. Leave two inches of clearance for hoses and wiring you cannot see.
- Test the walking path. Cut a cardboard rectangle the size of your proposed bench or table and set it down. If you cannot pass with a laundry basket or a cooler, your layout fails before you spend a dollar.
- For anything that folds or slides, measure it in both states. A table that fits down might not fit in the path when it is up, and that is the measurement that matters at 10 p.m. when you are making dinner.
- Bring a tape measure to the store and check the box. Manufacturers round dimensions; your camper does not.
Budgeting for a Weekend Overhaul
Most guides on small camper interior ideas skip the part where you actually pay for things, and the few numbers floating around online are all over the place. One builder calls a full renovation "budget-friendly" at four figures; another gets a projector screen rig together for under sixty dollars. That spread is useless if you are trying to plan a Saturday and Sunday that does not leave your camper torn apart till next month.
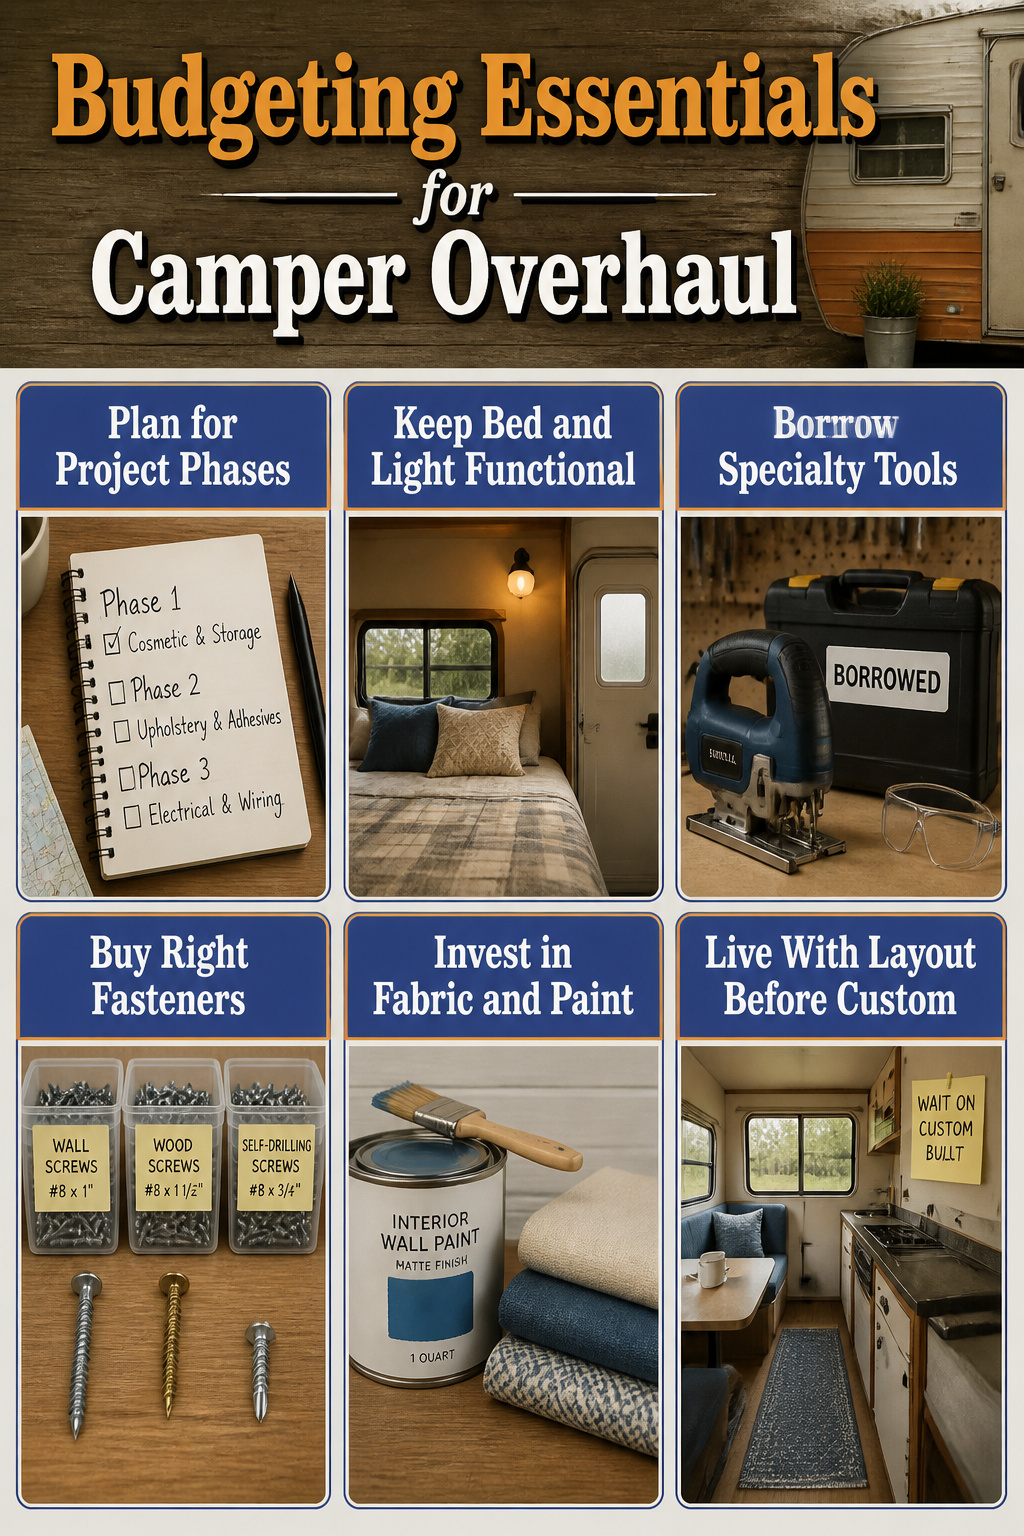
Start by deciding what has to work Monday morning. If you gut the sleeping area and the weather turns, you have bought yourself a very expensive storage shed. Phase projects so the bed, the door seal, and one working light stay intact every weekend. Do the cosmetic stuff, the storage tweaks, the secondary lighting in round one. Save anything involving adhesive curing, cushion re-upholstering, or electrical runs for a weekend when you can leave windows open and sleep in the house if fumes linger.
Where to spend and where to save depends on what you already own. Borrow or rent the one specialty tool you need once. Buy the fastener that actually fits your wall substrate; the wrong screw pulls out of thin paneling and costs you the repair plus the do-over. Fabric and paint are where you get style without debt. A quart of the right paint and new fabric on existing cushions changes the whole feel for less than a new fixture runs. Skip the custom-built anything until you have lived with the layout through one trip. What looks clever in the driveway is often in the way at midnight when you need the bathroom.
Eco-Friendly Materials That Fit the Budget
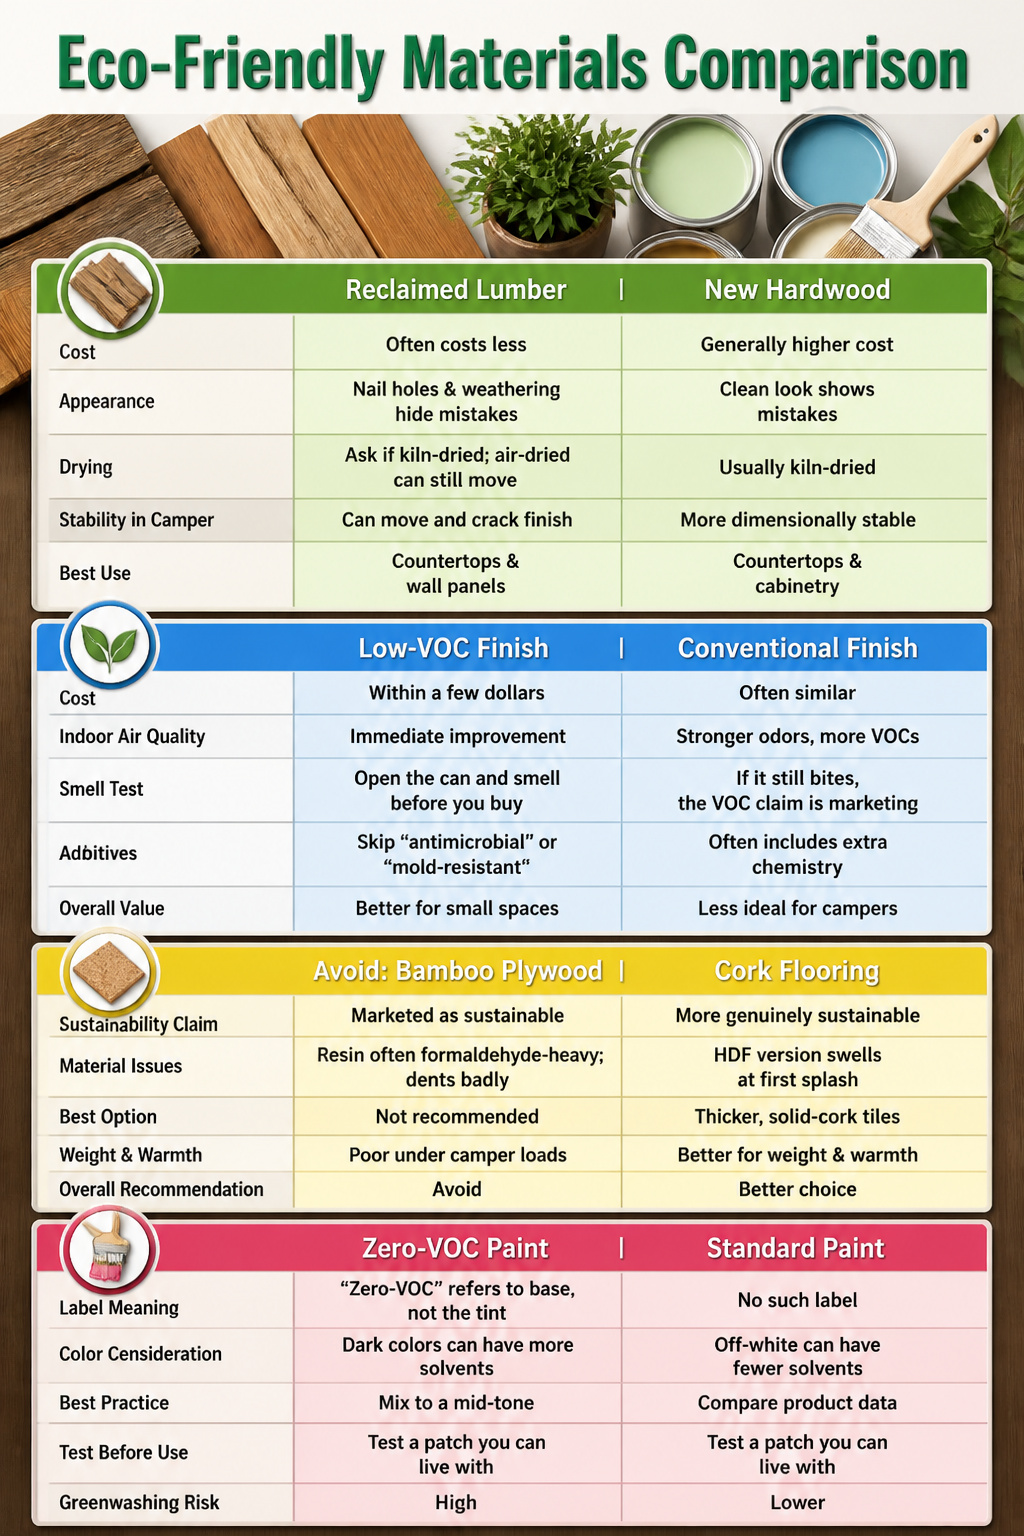
Reclaimed lumber for a camper countertop or wall panel often costs less than new hardwood at the same yard, and the nail holes and weathering hide small mistakes you will make cutting to fit. Ask the seller whether the batch was kiln-dried; air-dried stock can still move enough in a moving vehicle to crack your finish over a season of temperature swings.
Low-VOC polyurethane and water-based lacquer have come down to within a few dollars of their solvent-based equivalents, and the difference in air quality inside sixty square feet is immediate. Open the can and smell before you buy: if it still bites, the VOC claim is marketing. Skip anything labeled "antimicrobial" or "mold-resistant" with undisclosed additives; the extra chemistry serves a camper poorly and costs more.
What to avoid: bamboo plywood marketed as sustainable. The resin that binds it is often formaldehyde-heavy, and the material dents badly under the point loads of camper life. Cork flooring fares better for weight and warmth, but only the thicker, solid-cork tiles; the veneered HDF version swells at the first sink splash. Paint is where greenwasting hides most often. "Zero-VOC" on the label means the base, not the tint; dark colors from some lines end up higher in solvents than conventional off-white from others. Mix to a mid-tone and test a patch you can live with.
Frequently Asked Questions
How can I make my RV look nice?
Start with a coordinated palette of two or three colors total, and keep the base walls light so the space feels intentional rather than scattered. Add personality through removable art, slipcovers, and textiles you can wash or swap out between trips. Layer thrifted pieces with newer items so the space feels collected, not staged.
What colors make your RV look bigger?
White, soft gray, or pale blue bounce daylight around and keep the interior from closing in. Painting trim and cabinets to match the walls removes visual edges that would otherwise break the space into tiny, cluttered boxes. A light base lets you add accent shades in small doses without crowding things.
How do I maximize storage in a small camper?
Use vertical wall organizers near the door for shoes and outer layers, and line the galley with narrow racks so counters stay clear. Under the bed, slide in rolling drawers or vacuum-sealed bags that shrink fabrics down enough to stop fighting the lid. Built-in cabinets hide daily clutter and keep the visual noise down, which makes the whole camper feel larger.
What are the best ideas for a camper van kitchen?
A fold-out table mounted to the wall works as a desk for morning coffee and a dining surface, then disappears to reclaim floor space. For cooking outside twice a week or more, add a pull-out kitchen on sliders that keeps grease and smells out of your living space entirely. Sequence matters more than furniture: you need a landing zone for groceries, counter space between sink and cooktop, and somewhere to plate without crossing paths.
How can I make my camper feel more cozy?
Add a low-pile rug where you step out of bed; it takes the edge off cold mornings and costs less than a tank of gas. Layer in machine-washable cushions and throw blankets in cotton, linen, or short-nap faux fur that survive the road and wash easily. String lights near the bed create a softer evening layer that makes the space feel larger than one harsh overhead ever could.